Order Attribute
Extension Installation
For Magento Marketplace Customers
-
Find the Composer name and version of the extension in the extension's composer.json file.
-
Login to your SSH and run:
- composer require mavenbird/module-order-attributes
- Wait for Composer to finish updating your project dependencies and make sure there aren't any errors.
-
To verify that the extension installed properly, run the command:
- php bin/magento module:status Mavenbird_OrderAttributes
- By default, the extension is probably disabled.
- Enable the extension and clear static view files:
- php bin/magento module:enable Mavenbird_OrderAttributes --clear-static-content
- php bin/magento setup:upgrade
- For Magento version 2.0.x to 2.1.x - php bin/magento setup:static-content:deploy
- For Magento version 2.2.x & above - php bin/magento setup:static-content:deploy --f
- php bin/magento cache:flush
For Mavenbird Customers
- Extract the zip folder and upload our extension to the root of your Magento 2 directory via FTP.
- Login to your SSH and run below commands step by step:
- php bin/magento setup:upgrade
- For Magento version 2.0.x to 2.1.x - php bin/magento setup:static-content:deploy
- For Magento version 2.2.x & above - php bin/magento setup:static-content:deploy --force
- php bin/magento cache:flush
Easily collect and manage additional order information with the Magento 2 Order Attribute Extension. Add unlimited custom fields to the checkout page, control field visibility based on conditions, and display collected data in the admin panel, emails, and PDF documents. Fully compatible with Hyvä ,the extension ensures a smooth and accessible shopping experience.
- Add any number of attributes to your checkout page.
- Show or hide fields based on shipping or payment methods.
- View and manage extra attribute data directly in the order grid.
- Include custom attributes in order emails and PDF documents.
- Seamlessly works with Hyvä themes and checkout.
- Ensures accessibility for all users.
Configuration
Customize order details with additional fields. Find the settings under Stores > Configuration > Mavenbird Extensions > Order Attributes.
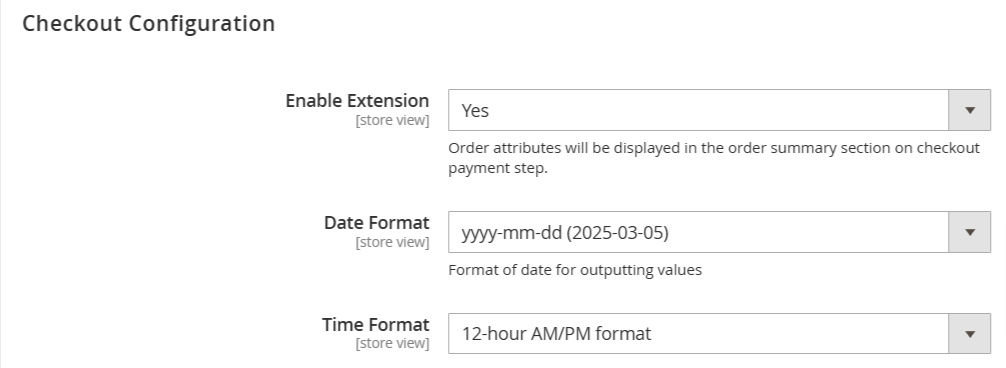
Enable Extension: When enabled (set to "Yes"), order attributes will be displayed in the order summary section during the checkout's payment step.
Date Format: Specifies the format for displaying date values associated with order attributes.
Time Format: Sets the format for displaying time values associated with order attributes.
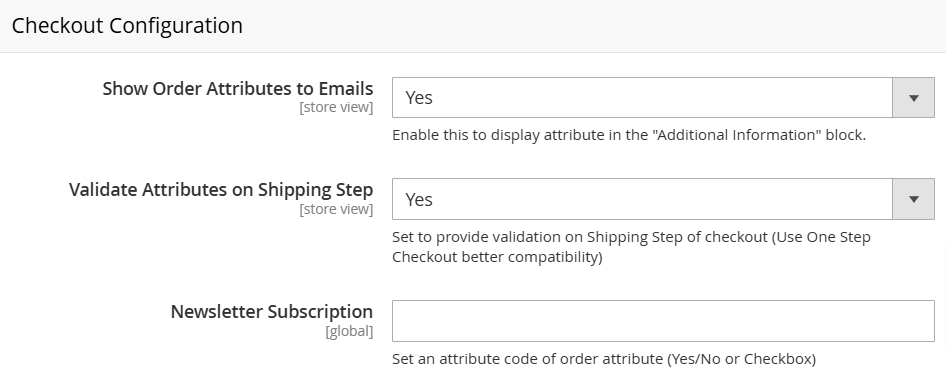
Show Order Attributes to Emails: When enabled (set to "Yes"), attributes are displayed in the "Additional Information" block of the email.
Validate Attributes on Shipping Step: Enables validation of the order attributes during the shipping step of the checkout process.
Newsletter Subscription: This setting allows you to connect a specific order attribute (Yes/No or Checkbox) to newsletter subscriptions.
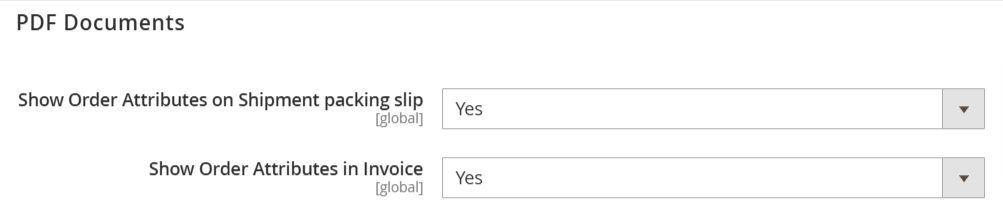
Show Order Attributes on Shipment Packing Slip: Determines whether order attributes are included on the shipment packing slip PDF document. When enabled (set to "Yes"), order attributes will appear on the packing slip.
Show Order Attributes in Invoice: Controls whether order attributes are included in the invoice PDF document. When enabled (set to "Yes"), order attributes will be displayed on the invoice.

Show Order Attributes in Invoice Grid: Determines whether order attributes are displayed in the invoice grid within the Magento admin panel. Setting this to "Yes" makes the attributes visible as columns in the invoice list view.
Show Order Attributes in Invoice Create: Controls whether order attributes are visible during the invoice creation process in the admin panel. When enabled ("Yes"), the attributes will be displayed when an admin user is creating a new invoice for an order.
Show Order Attributes in Invoice View: Determines whether order attributes are displayed when viewing an individual invoice in the Magento admin panel. Setting this to "Yes" ensures that the attributes are visible on the invoice details page.
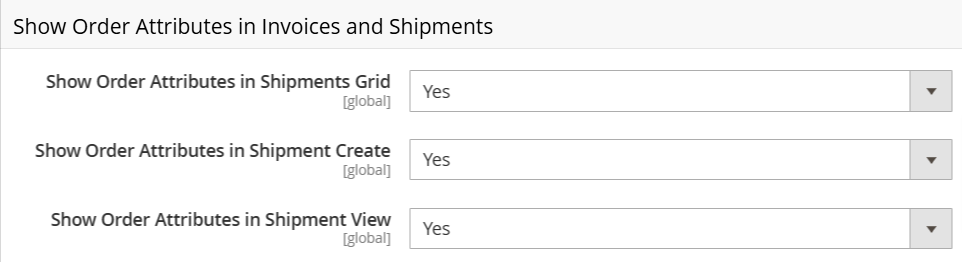
Show Order Attributes in Shipments Grid: Determines whether order attributes are displayed in the shipment grid within the Magento admin panel. When enabled ("Yes"), the attributes are shown as columns in the list of shipments.
Show Order Attributes in Shipment Create: Controls whether order attributes are visible during the shipment creation process in the admin panel. Setting this to "Yes" will display the attributes when an admin user is creating a new shipment for an order.
Show Order Attributes in Shipment View: Determines whether order attributes are displayed when viewing an individual shipment in the Magento admin panel. When enabled ("Yes"), the attributes are visible on the shipment details page.
Attribute Creation
Add custom attributes to your Magento 2 orders. Navigate to Sales → Manage Order Attributes to create new attributes.
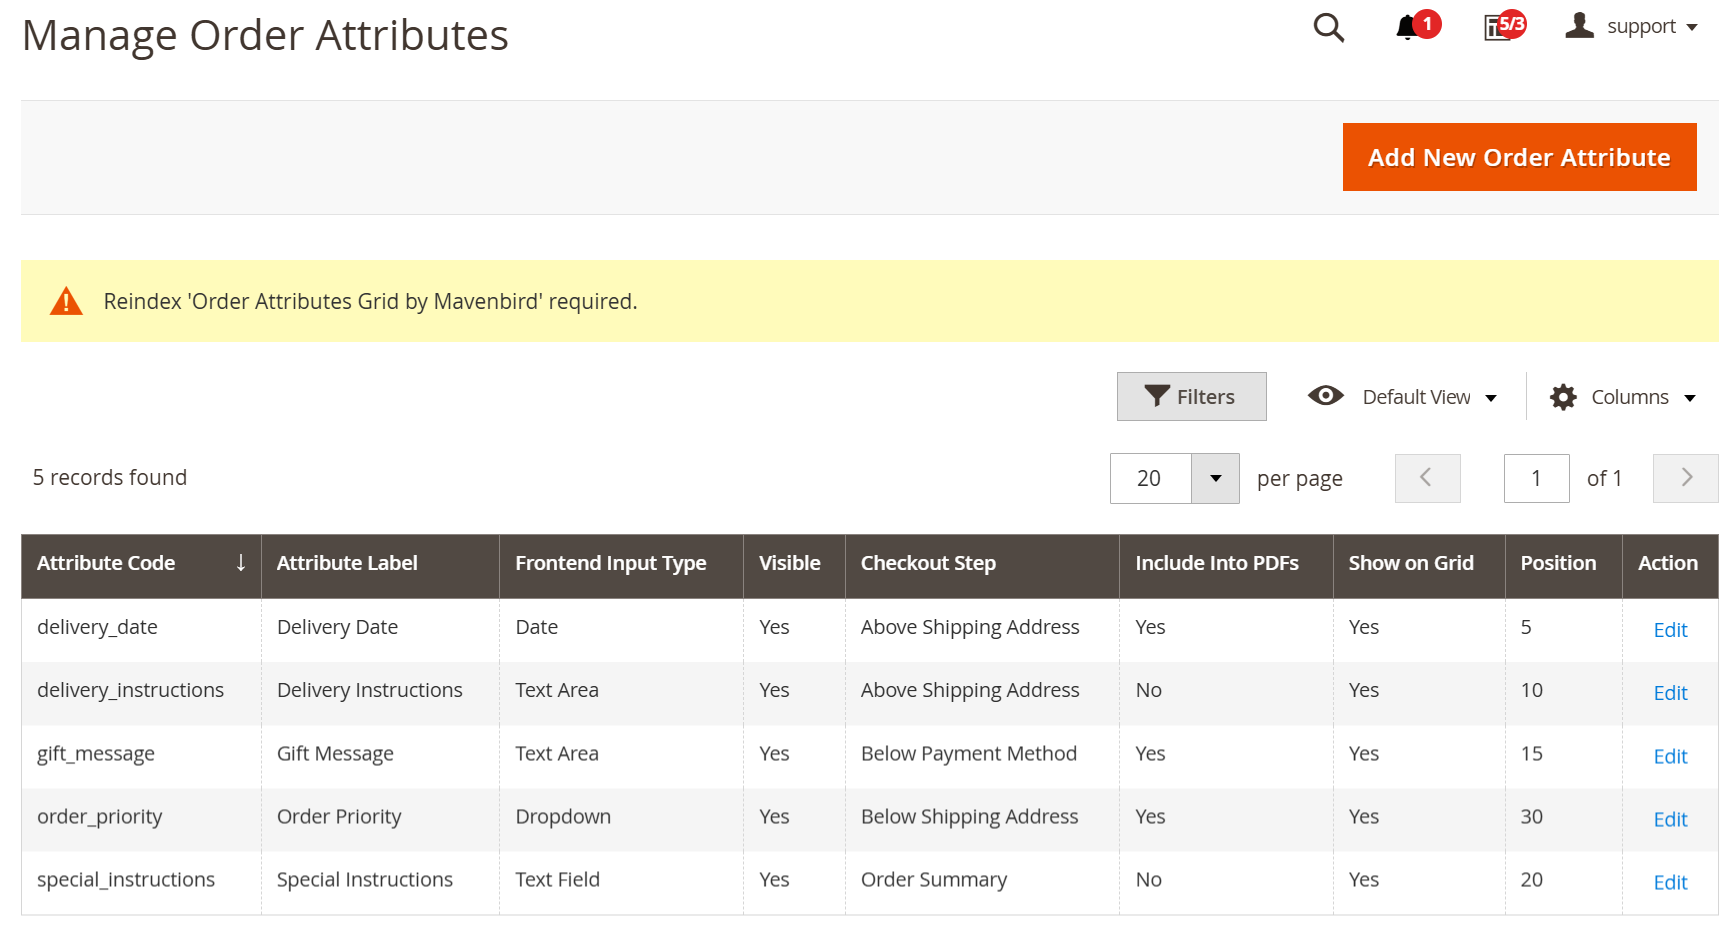
All created attributes are displayed in a grid. Click 'Add New Order Attribute' to create a new attribute, or select an existing attribute to edit.
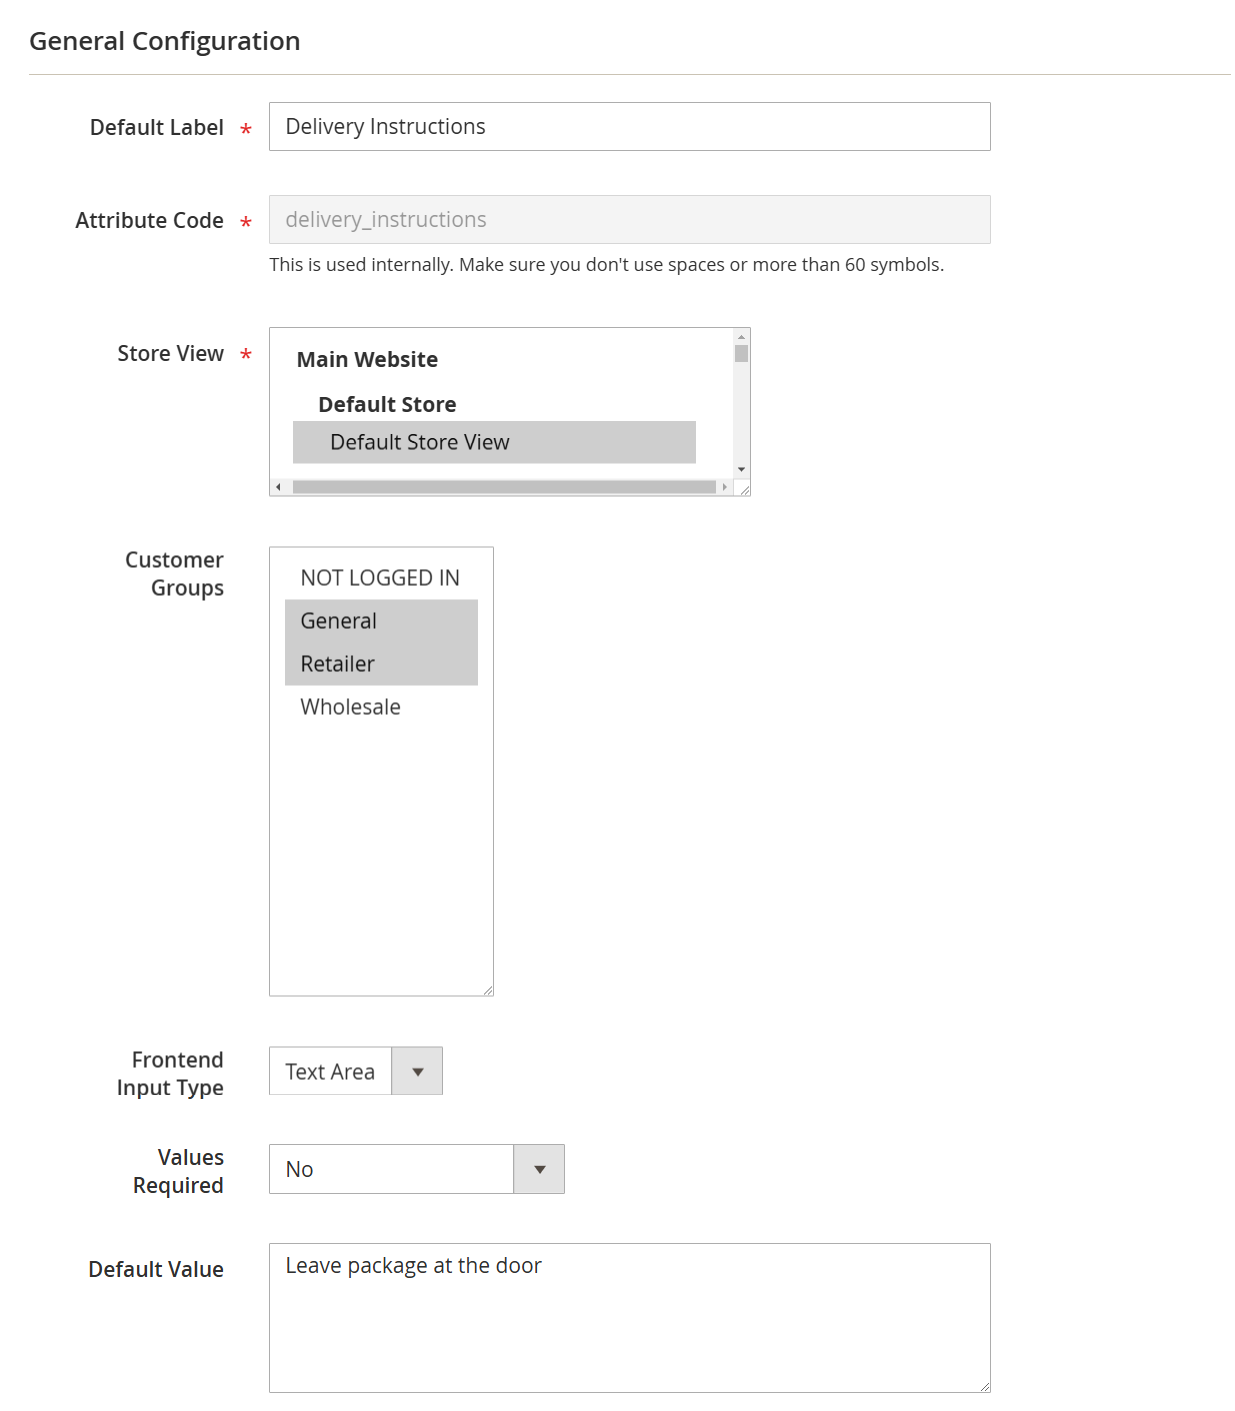
Default Label: Enter the label for the attribute. This label will be displayed to customers on the frontend.
Attribute Code: Specify a unique code for internal use. This code is used by the system and is not visible to customers.
Store View: Select the specific store views where the attribute will be visible and available.
Customer Groups: Choose the customer groups that will be able to see and interact with this attribute.
Frontend Input Type: Select the appropriate input type for the attribute. Available options include:
- Text Field: A single line of text input.
- Text Area: A multi-line text input box.
- Date: A date selection field.
- Date With Time: A date and time selection field.
- Yes/No: A simple yes/no selection.
- Dropdown: A single-select dropdown menu.
- Checkbox Group: Allows selecting multiple options from a list of checkboxes.
- Radio Buttons: Allows selecting a single option from a list of radio buttons.
- HTML: Allows adding HTML code.
- Single File Upload: Allows customers to upload a single file.
Default Value: (Applicable for Text Field, Text Area, Date, Date With Time, Yes/No input types) Define a default value for the attribute.
Values Required: If set to "Yes," customers must provide a value for this attribute. Leaving the field blank will not be allowed during registration or checkout.
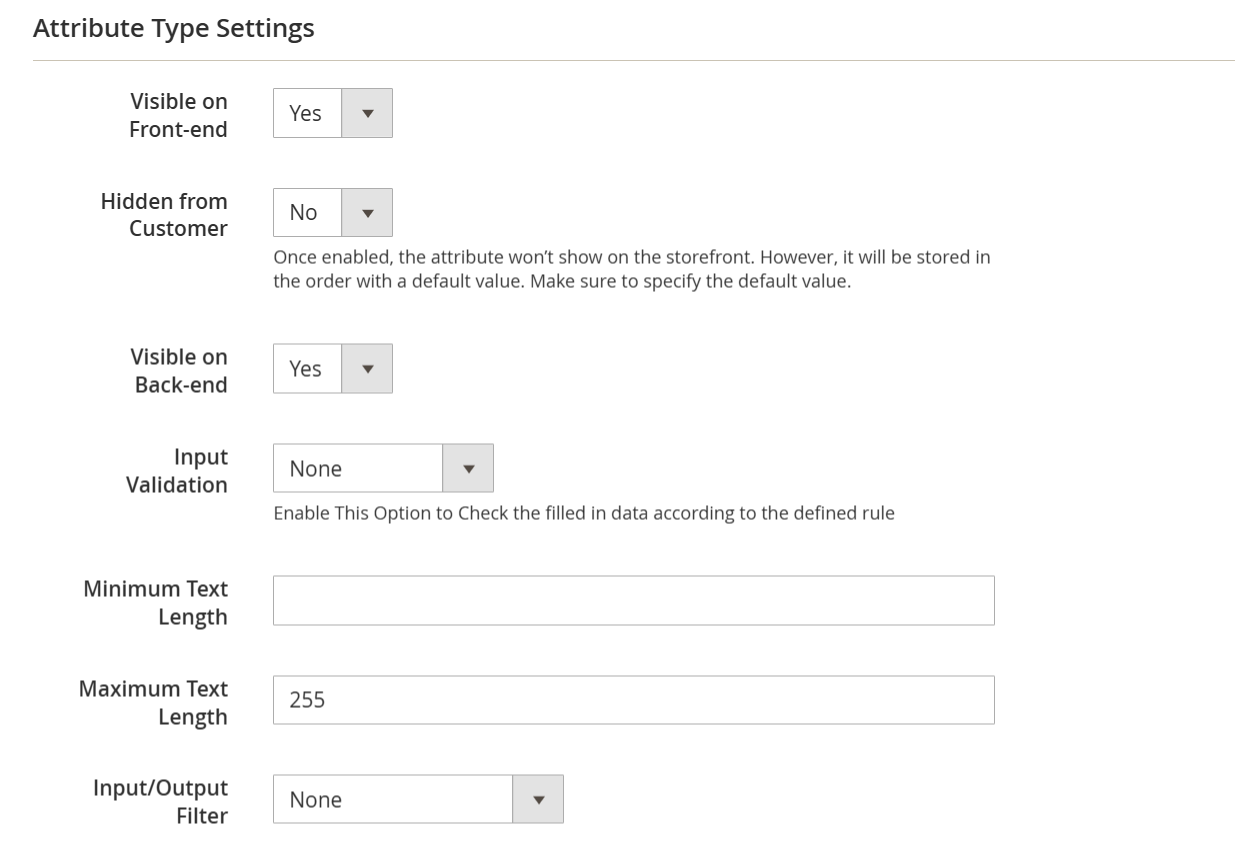
Visible on Frontend: Enable this option to display the attribute on the storefront (frontend) for customers.
Visible on Backend: Enable this option to display the attribute in the Magento Admin panel (backend).
Default Value: Specify a default value for the attribute. This value will be pre-populated if no other value is entered.
Input Validation: Enable this option to validate the data entered by the user before submission. This helps ensure data quality and accuracy.
Minimum Text Length: For text-based attributes, specify the minimum number of characters required.
Maximum Text Length: For text-based attributes, specify the maximum number of characters allowed.
Input/Output Filter: For text and text area input types, this option provides security filtering. Choose:
- Strip HTML Tags: Removes all HTML tags from the input to prevent code injection.
- Escape HTML Entities: Encodes HTML characters to prevent code execution.
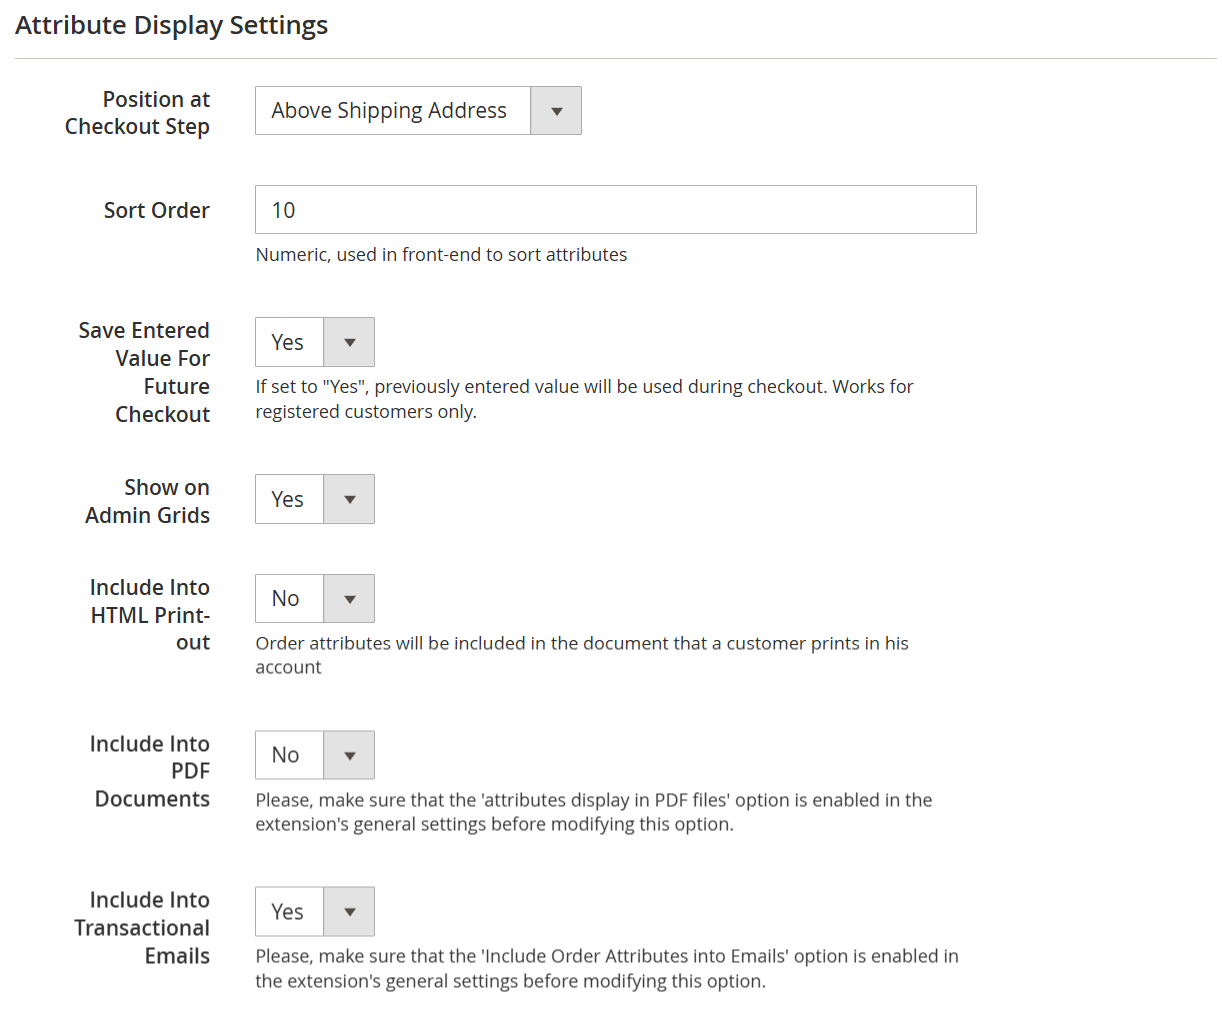
Position at Checkout Step: Specify where this attribute should be displayed during the checkout process.
Available positions:
- Above Shipping Address
- Below Shipping Address
- Above Shipping Methods
- Below Shipping Methods
- Above Payment Method
- Below Payment Method
- Order Summary
- None
Sort Order: Specify the order in which this attribute will be displayed on the storefront (frontend). Lower numbers appear first.
Save Entered Value For Future Checkout: If set to "Yes," the value entered by registered customers will be saved and automatically pre-filled on subsequent checkouts. Customers will still be able to edit the pre-filled value.
Show on Admin Grids: Enable this option to display the attribute as a column in relevant grids within the Magento Admin panel (backend).
Include Into HTML Print-out: Enable this option to include the attribute's value in HTML-based printouts (e.g., order confirmation pages).
Include Into PDF Documents: Enable this option to include the attribute's value in generated PDF documents (e.g., invoices, packing slips).
Include Into Transactional Emails: Enable this option to include the attribute's value in transactional emails sent to customers (e.g., order confirmation emails).
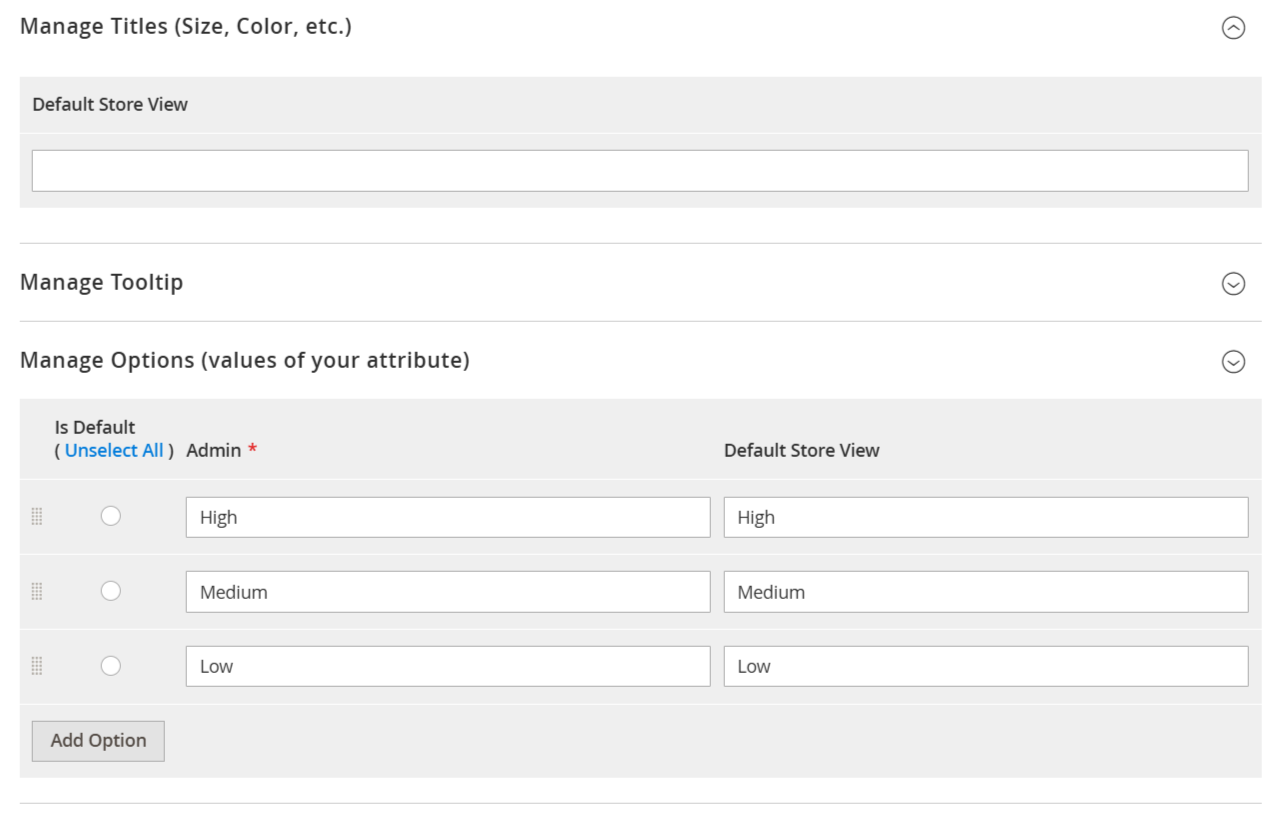
Manage Titles: Define the attribute title (label) for each store view where the attribute is enabled. This allows you to customize the attribute's name for different languages or store contexts.
Manage Tooltip: Add a tooltip that will be displayed near the attribute on the storefront (frontend). Tooltips provide helpful context or instructions to customers.
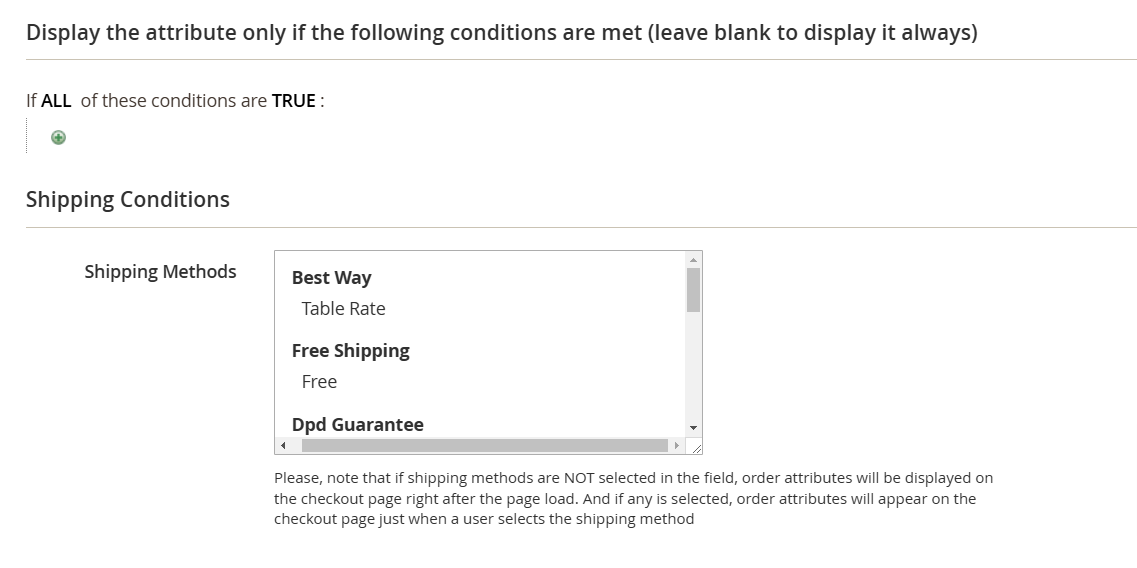
Display the attribute only when the following conditions are met (leave blank to always display): The conditions dropdown includes all product attributes with the "Use for Promo Rule Conditions = Yes" setting.
Shipping Methods: Specify the shipping methods for which this attribute should be displayed. The attribute will only be shown to customers who select one of these methods during checkout.
Managing Attribute Relationships
To define relationships between attributes (e.g., showing one attribute based on the value of another), go to: Sales > Order Attributes > Manage Attribute Relations.
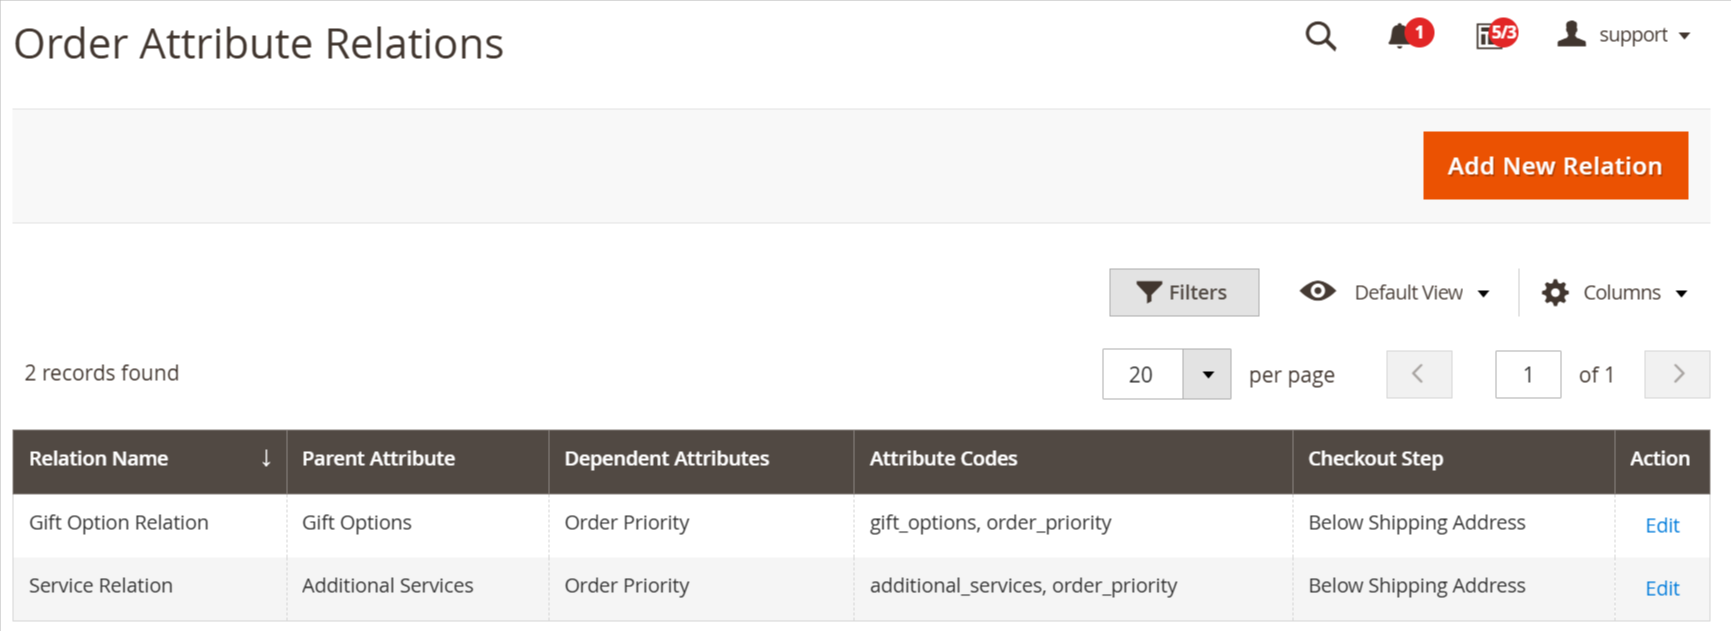
The Order Attribute Relations grid displays all existing attribute relations. From here, you can add new relations or manage existing ones.
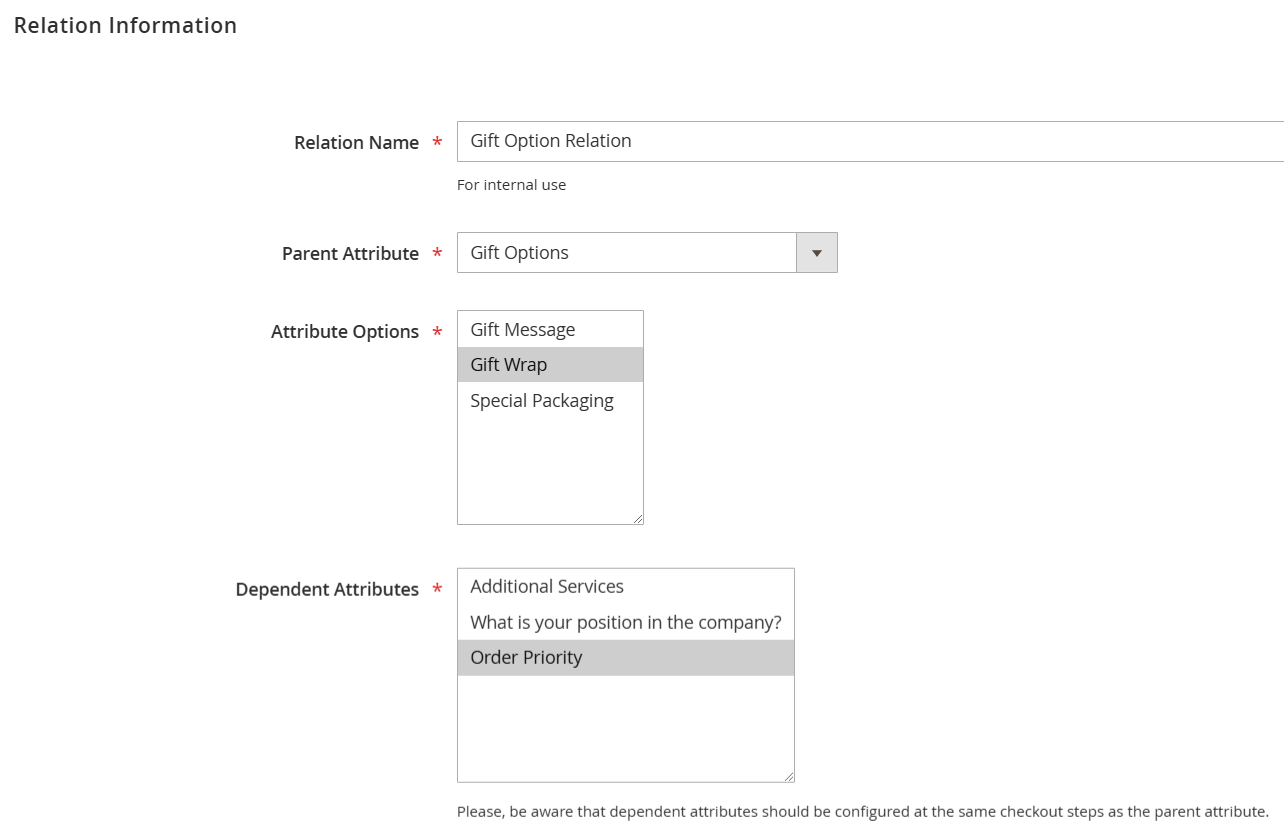
Relation Name: Enter a descriptive name for this relation. This name is for internal use only and will help you identify the relation in the admin panel.
Parent Attribute: Select the attribute that will control the visibility of other attributes. This is the main attribute that users will interact with first.
Attribute Options: Choose the specific values of the Parent Attribute that will trigger the display of the Dependent Attributes. When a customer selects one of these values, the dependent attributes will become visible.
Dependent Attributes: Select the attributes that will only be displayed when a customer chooses a specific value for the Parent Attribute (as defined in "Attribute Options").
Admin Panel Attribute Visibility
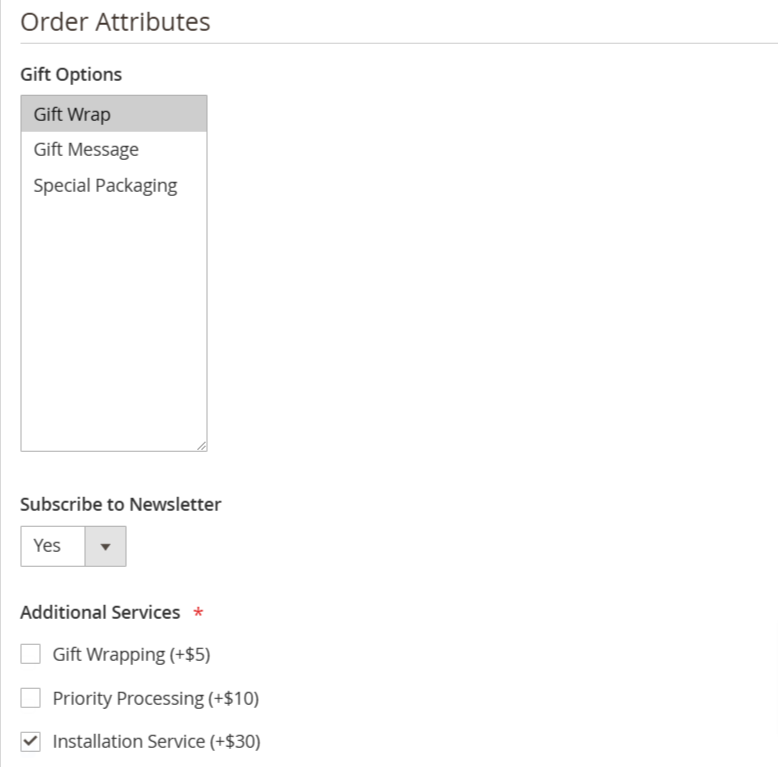
Order Grid: Any custom attributes you add to orders will automatically appear as columns in the main Orders grid. This allows you to quickly scan order information.
Order View Page: The full data for all custom order attributes will be displayed on the Order View page when you open a specific order. This provides a comprehensive view of the order's attributes.

You can modify the values of custom order attributes by clicking the "Edit" button on the individual Order View page.
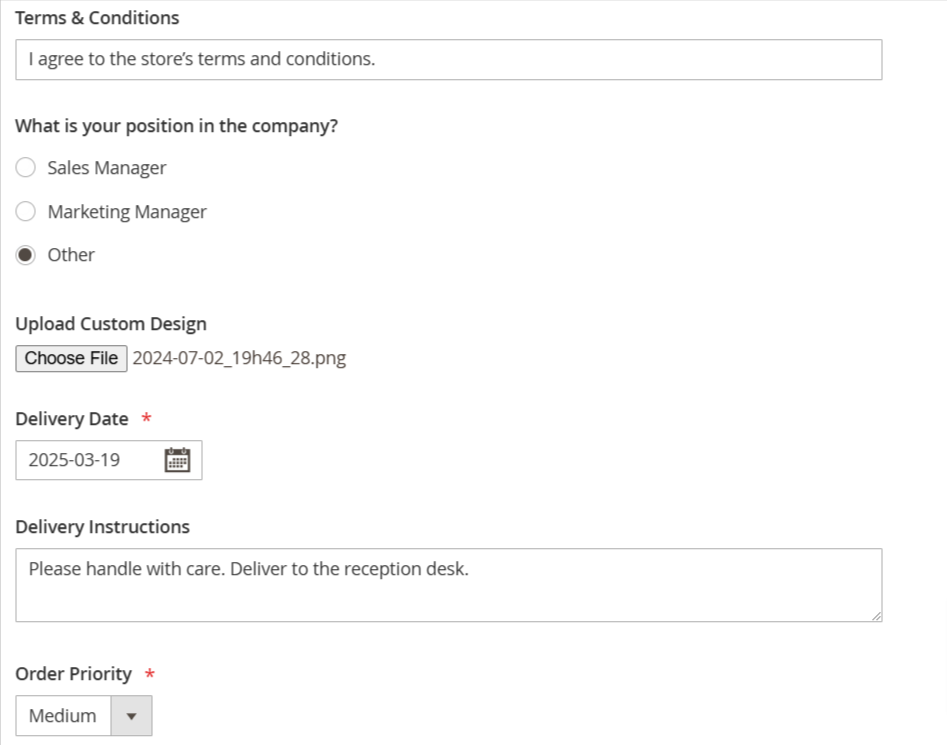
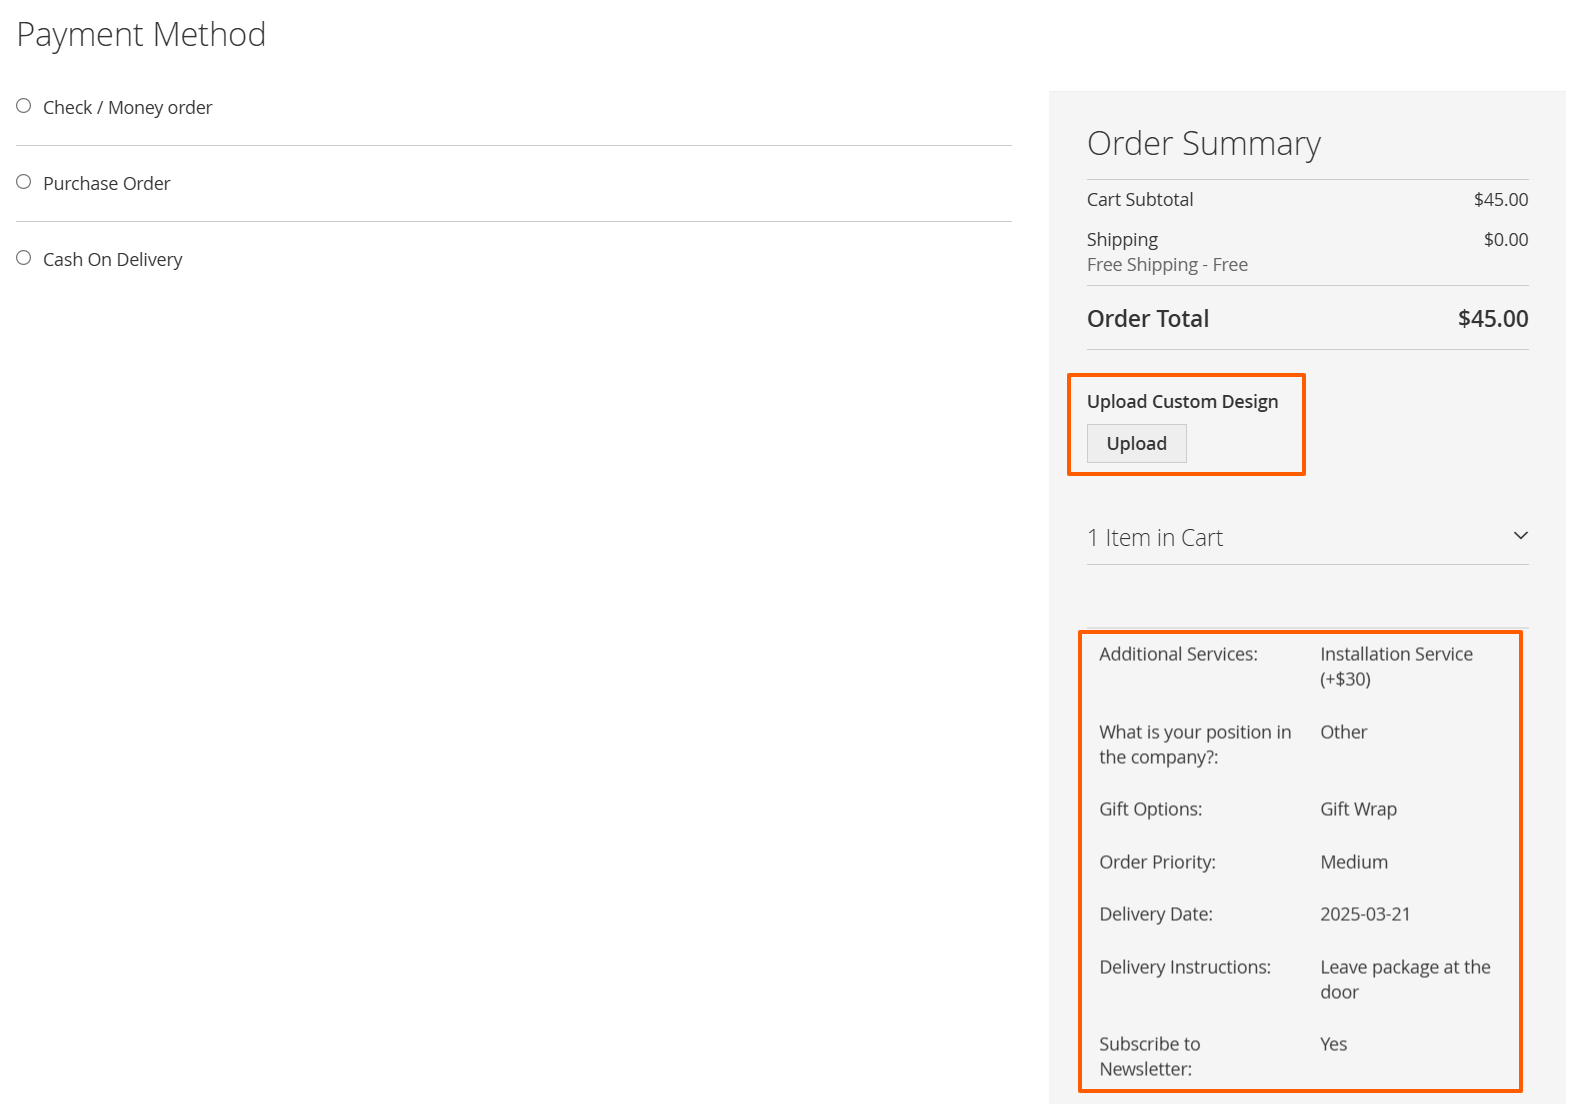
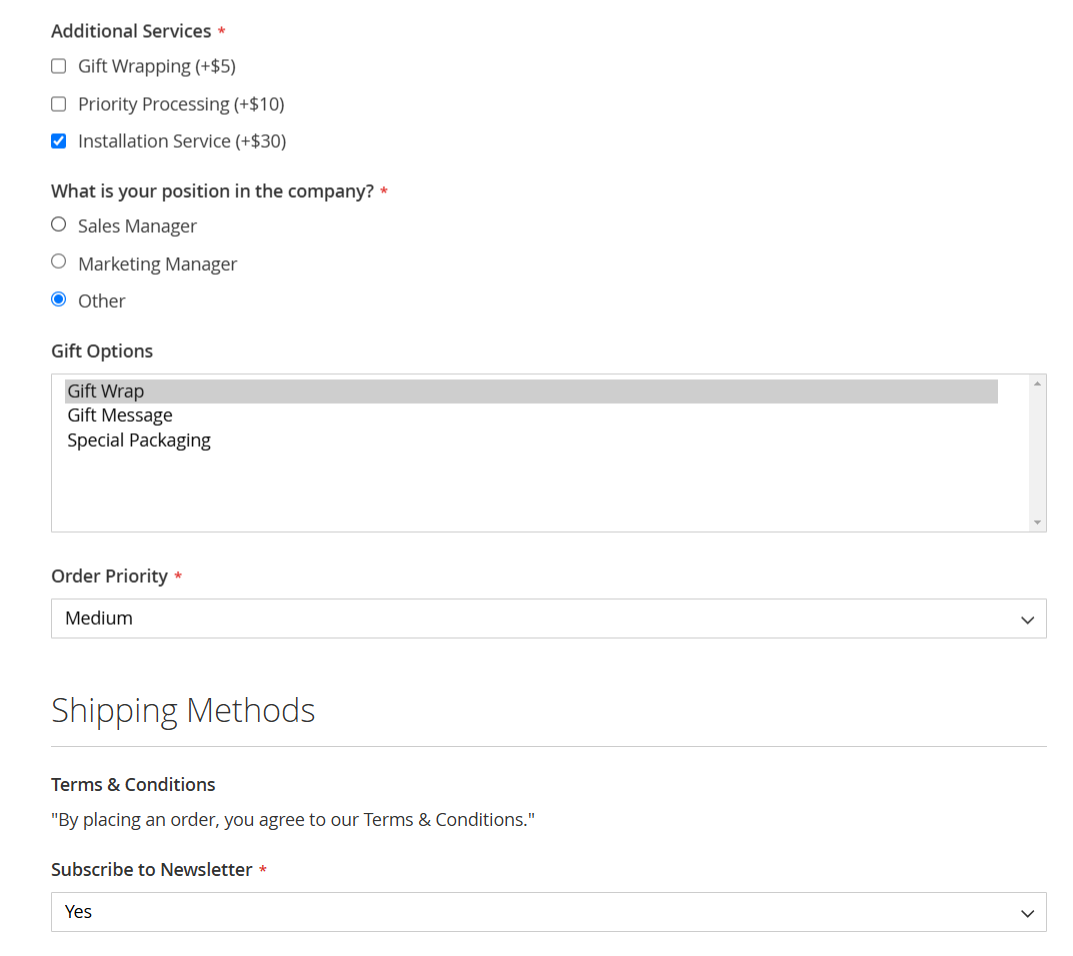
Custom Attributes on Checkout Page
Below is an example showcasing custom order attributes with different input types (e.g., text fields, dropdowns, radio buttons, and checkboxes) as displayed during registration and checkout.
For Date and Date & Time attributes, a user-friendly calendar is provided. Clicking on the attribute field will display the calendar for easy date selection.
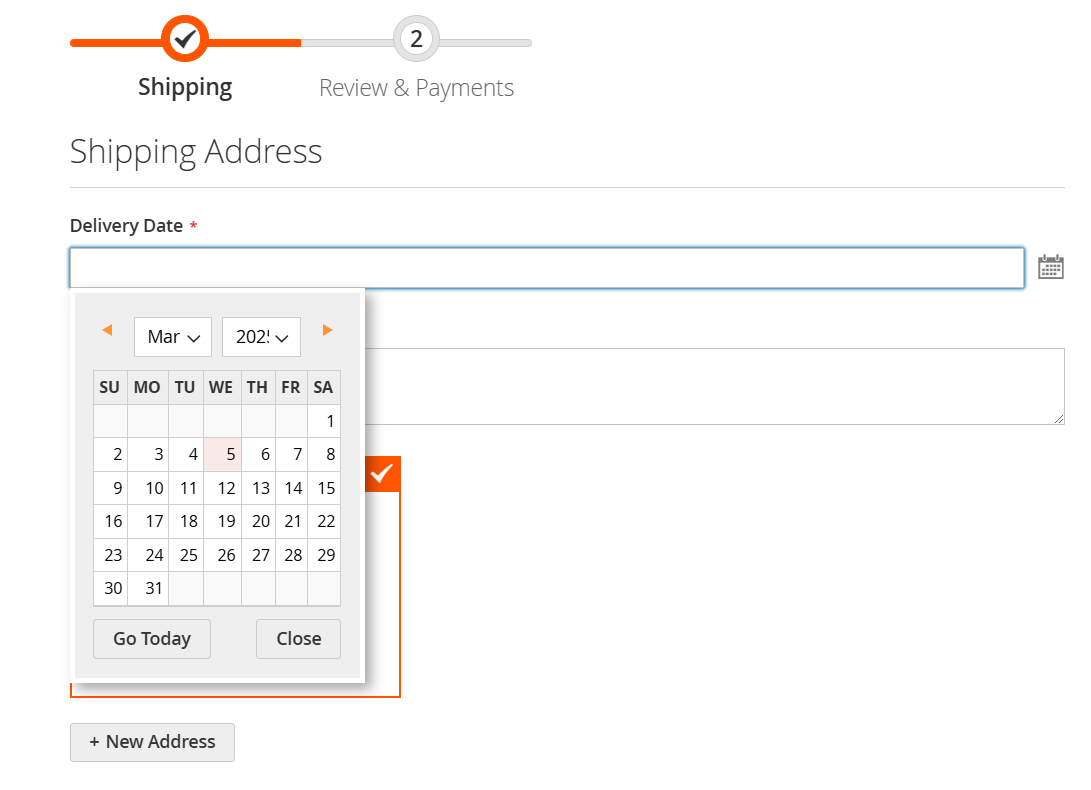
Customers will see their selected attribute values on the checkout page.
For all input types except Dropdown, Checkbox Group, and Radio Buttons, you can specify a default value directly in the attribute's configuration field.
For these input types, you can add multiple options and labels by navigating to the "Manage Label/Options" tab.
Single File Upload: For the Single File Upload input type, you must define the allowed file extensions and the maximum file size. See the example screenshot below for a configuration demonstration. The right side of the image shows how this appears on the frontend.