
We all know that Magento 2 checkout’s flow contains 2 steps. The Shipping and the Payment & Review steps. For personal uses, you may want to add some additional logic like separating Payment and Review to individual steps or creating a brand new step for your own customization.
This topic will guide you to create a new checkout step in Magento 2. This step particularly does one thing, let users know whether they are logged in or not. Not much a real situation but we will get into advanced topics later. Learn more: Simplify Checkout Process with One Step Checkout
Related Posts
- Magento 2 Customize Checkout topic
- Add a custom checkout field in Magento 2
- Magento 2 Optimized Checkout Page
- How to add a new input form to checkout
- Customization Checkout Page
- Checkout Page 2 Columns
- How to add a new input form to checkout
3 Steps to add a new step to the checkout page
You should know how to create a basic Magento 2 module. All of customized files will be inside this module.
Let’s begin.
Step 1: Create the .js file implementing the view model
Create the checkout-login-step.js file under Mavenbird/HelloWorld/view/frontend/web/js/view
directory.
Basically, we need step_code, step_title, order and the
condition that allows to display this step.
Here is the code (Read code comment to get more info)
define(
    [
        'ko',
        'uiComponent',
        'underscore',
        'Magento_Checkout/js/model/step-navigator',
        'Magento_Customer/js/model/customer'
    ],
    function (
        ko,
        Component,
        _,
        stepNavigator,
        customer
    ) {
        'use strict';
        /**
        * check-login - is the name of the component's .html template
        */
        return Component.extend({
            defaults: {
                template: 'Mavenbird_HelloWorld/check-login'
            },

            //add here your logic to display step,
            isVisible: ko.observable(true),
            isLogedIn: customer.isLoggedIn(),
            //step code will be used as step content id in the component template
            stepCode: 'isLogedCheck',
            //step title value
            stepTitle: 'Logging Status',

            /**
            *
            * @returns {*}
            */
            initialize: function () {
                this._super();
                // register your step
                stepNavigator.registerStep(
                    this.stepCode,
                    //step alias
                    null,
                    this.stepTitle,
                    //observable property with logic when display step or hide step
                    this.isVisible,

                    _.bind(this.navigate, this),

                    /**
                    * sort order value
                    * 'sort order value' < 10: step displays before shipping step;
                    * 10 < 'sort order value' < 20 : step displays between shipping and payment step
                    * 'sort order value' > 20 : step displays after payment step
                    */
                    15
                );

                return this;
            },

            /**
            * The navigate() method is responsible for navigation between checkout step
            * during checkout. You can add custom logic, for example some conditions
            * for switching to your custom step
            */
            navigate: function () {

            },

            /**
            * @returns void
            */
            navigateToNextStep: function () {
                stepNavigator.next();
            }
        });
    }
);
Step 2: Create an .html template for the component
In the above step, we use Mavenbird_HelloWorld/check-login as our template, let’s create it.
Create a
new html file named check-login.html under Mavenbird/HelloWorld/view/frontend/web/template
directory.
Here is the code
The customer is not Logged-in
Step 3: Add the new step to the Checkout page layout
We need to extend the checkout page’s layout to be able to display the new step
Add this file in
our module: Mavenbird/HelloWorld/view/frontend/layout/checkout_index_index.xml
The content as
follow:
-
-
-
-
-
-
- Mavenbird_HelloWorld/js/view/checkout-login-step
- 2
-
That’s the steps to add a new step to checkout page.
Clean cache and refresh your browser, the
result will appear like this
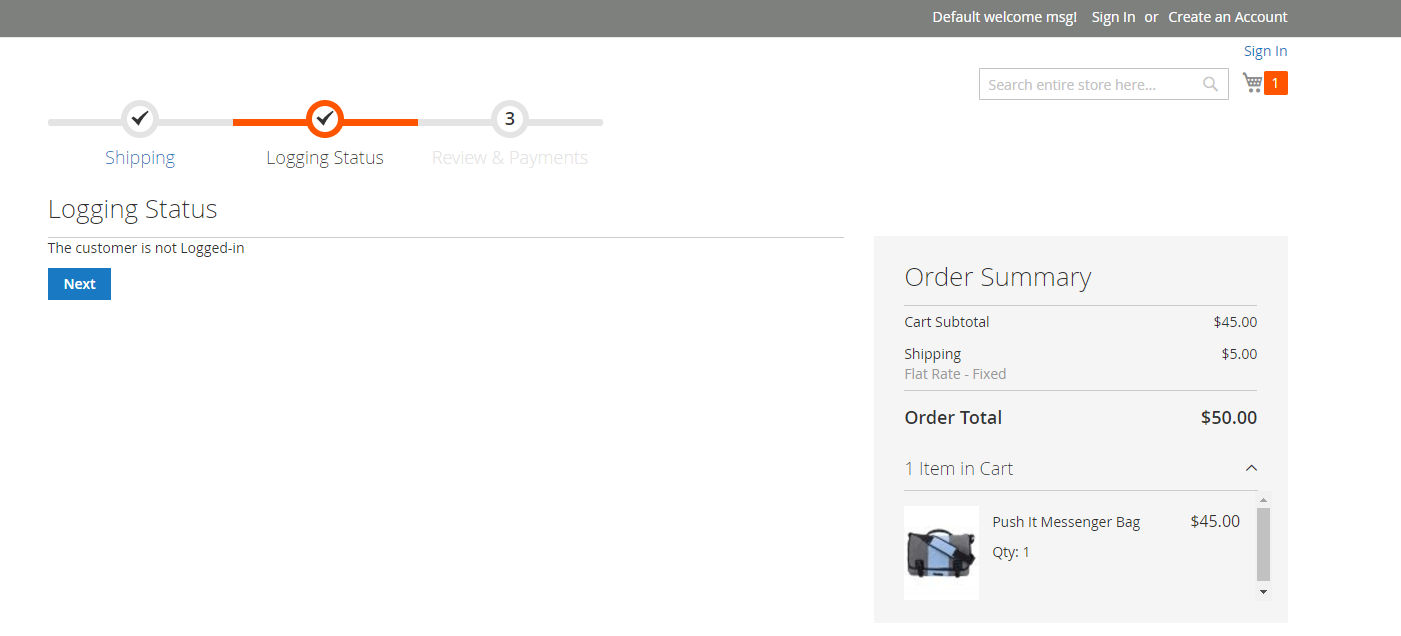
Final words
With this tutorial, you can create as many steps as you want for your store’s checkout process. Just remember to optimize the number of steps so that it doesn’t make customers frustrated when having to provide too much information.