How to Import Products in Magento 2
Magento 2.0 allows you to Import Products data to add or update the products, replace existing data and delete entities. This feature helps save a lot of time compared with manually configuring. Actually, almost data in Magento is contained in CSV files (Comma Separated Value file) which appears similar to Excel file but simpler. Therefore, we recommend you to become familiar with CSV files to import and export other types of data besides of products such as customer data, customer address data and product images. And the following is the instruction to import products to your Magento store. Let’s begin!
Import Products in Magento 2: Follow These 5 Steps
Step 1: Prepare the Data
First, you have to make your data ready.
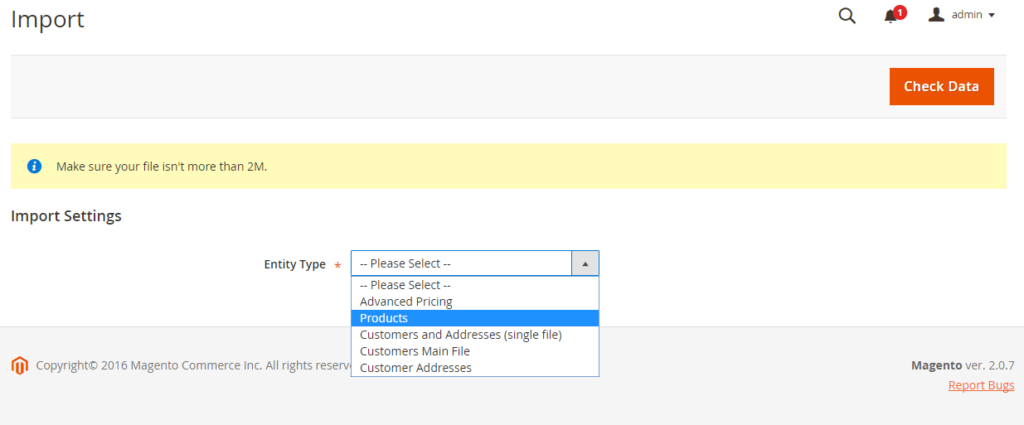
- On the Admin sidebar, choose System > Data Transfer > Import.
- In the Import Settings section, set Entity Type to “Products” as you are importing product data.
- After selecting the Entity Type, click Download Sample File. If you are prompted, click Save to start downloading the file.
- Open to view the sample file.
- Make sure that your CSV import file follows the sample file exactly.
- Confirm that the size of your import file does not exceed the limit shown in the message which is usually informed to be 2M.
- If the import data includes paths to product images, make sure that the image files have been uploaded to the appropriate location. The default location on the Magento server is pub/media/import. If the images reside on an external server, make sure that you have the full URL to the directory that contains the images.

Step 2: Configure Import Behavior
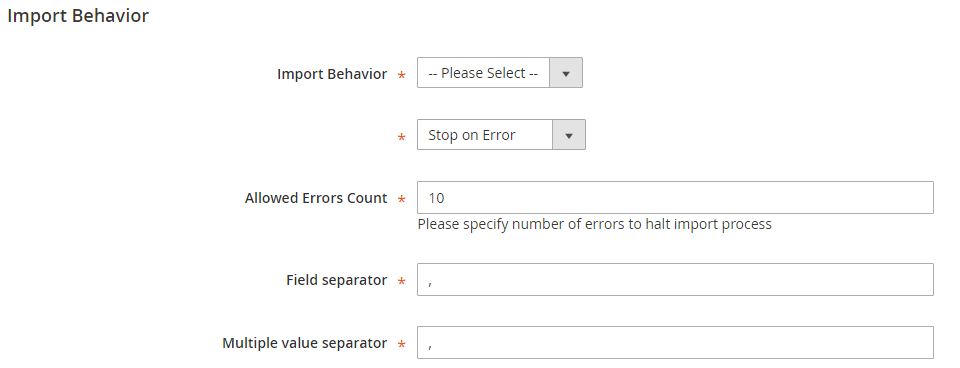
The Import process includes many requirements, therefore, you need to configure the behaviours beforehand:
- In the Import Behavior section, choose the action you want when importing data in the Import Behavior field: “Add/Update”, “Replace Existing Complex Data” or “Delete Entities”. Then set the following field to “Stop on Error” or “Skip Error Entries”.
- In the Allowed Errors Count field, enter a number of errors to pause the import process.
- In the Field separator and Multiple value separator fields, leave the default as “,” since the default separator in CSV file is a comma.

Step 3: Specify the Import File
Next, you will upload the file you want to import data from:
- In the File to Import section, click on the Choose File button and choose your import data file, then click Open.
- If the import data contains paths to product images, in
the Images File
Directory field, enter:
- The path to the uploaded images on the Magento server. For example: var/import.
- Or the full URL to the images on another server. For example: http://domain.com/images.

Step 4: Check the Data and Finish the Importing
To complete the import process, the imported data needs to be checked:
- In the upper-right corner, click Check Data and wait for the process to complete.
- If the file is valid, click the Import button shown in the Validation Results. Contrarily, correct the problem informed in the message and try again.
- When the importing completes, there will be a message to notify you.
Step 5: View the Import History
Now, all of the import history can be viewed in the backend:
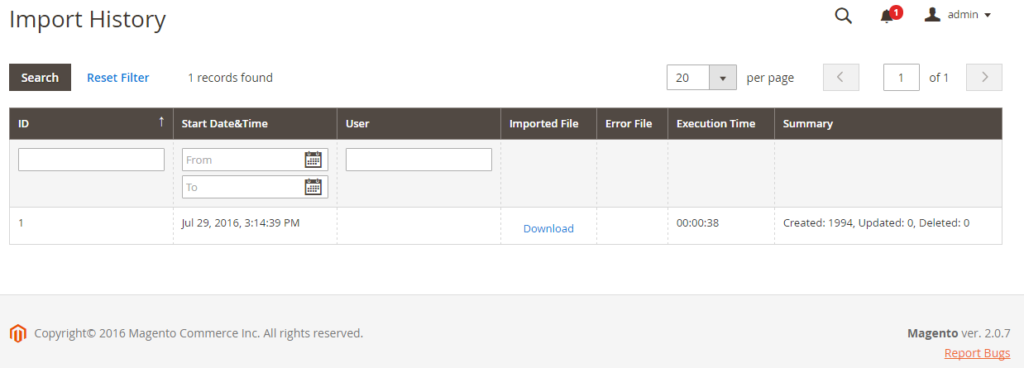
- On the Admin sidebar, choose System > Data Transfer > Import History.
- The import history detail table will show all the action of import/export for you to track.

The bottom line
Product Import in Magento 2 is no longer a manual, time-consuming task, but can become a simple and quick process, if you follow the above guide. You can also read more from the below related topics or discover the solution to import and export CMS, as well as tools to import and export categories for your Magento store. That’s all for today, and we’d love to hear more from you!


Please complete your information below to login.