How to Configure Product Custom Options
Magento 2 supports the feature of adding product options, making it easy for store owners to incorporate custom options for their products. By offering various product choices, you can significantly enhance your eCommerce capabilities and increase the likelihood of customers exploring all your offerings.
What are custom product options used for?
By adding custom options to a product in Magento 2, you allow customers to choose options tailored to their specific needs instead of being limited to standard product attributes.
This feature enables you to create a range of customizable product options, such as custom cart price rules and dynamic category rules. If your goal is to provide a versatile shopping experience, implementing custom product options is one of the most effective strategies to achieve that.
Get Product Custom Options Programmatically in Magento 2
- Step 1: Add object manager
- Step 2: Generate the product
- Step 3: Custom options
- Step 4: Configurable options
- Step 5: Grouped children
- Step 6: Bundle selection
Step 1: Create an object manager
$_objectManager = \Magento\Framework\App\ObjectManager::getInstance();
Step 2: Generate the product
Generate the product that needs to be assigned custom options.
$product = $_objectManager->get('\Magento\Catalog\Model\Product')->load($id);
Step 3: Custom options
$customOptions = $_objectManager->get('Magento\Catalog\Model\Product\Option')->getProductOptionCollection($product);
Step 4: Configurable Options
$productTypeInstance = $_objectManager->get('Magento\ConfigurableProduct\Model\Product\Type\Configurable');
$productAttributeOptions = $productTypeInstance->getConfigurableAttributesAsArray($product);
Step 5: Grouped Childs
$typeInstance = $_objectManager->get('Magento\GroupedProduct\Model\Product\Type\Grouped');
$childs = $typeInstance->getAssociatedProducts($product);
Step 6: Bundle selection
$store_id = $_storeManager->getStore()->getId();
            $options = $_objectManager->get('Magento\Bundle\Model\Option')
         ->getResourceCollection()
                          ->setProductIdFilter($product->getId())
                          ->setPositionOrder();
         $options->joinValues($store_id);
$typeInstance = $_objectManager->get('Magento\Bundle\Model\Product\Type');
$selections = $typeInstance->getSelectionsCollection($typeInstance->getOptionsIds($product), $product);
When completing all, this means the product options are active on your Magento 2 store.
How to Configure Magento 2 Custom Options from the Backend?
- Navigate to Catalog > Products.
- Select the product you wish to configure with custom options, or click the "Add New Product" button to create a new product.

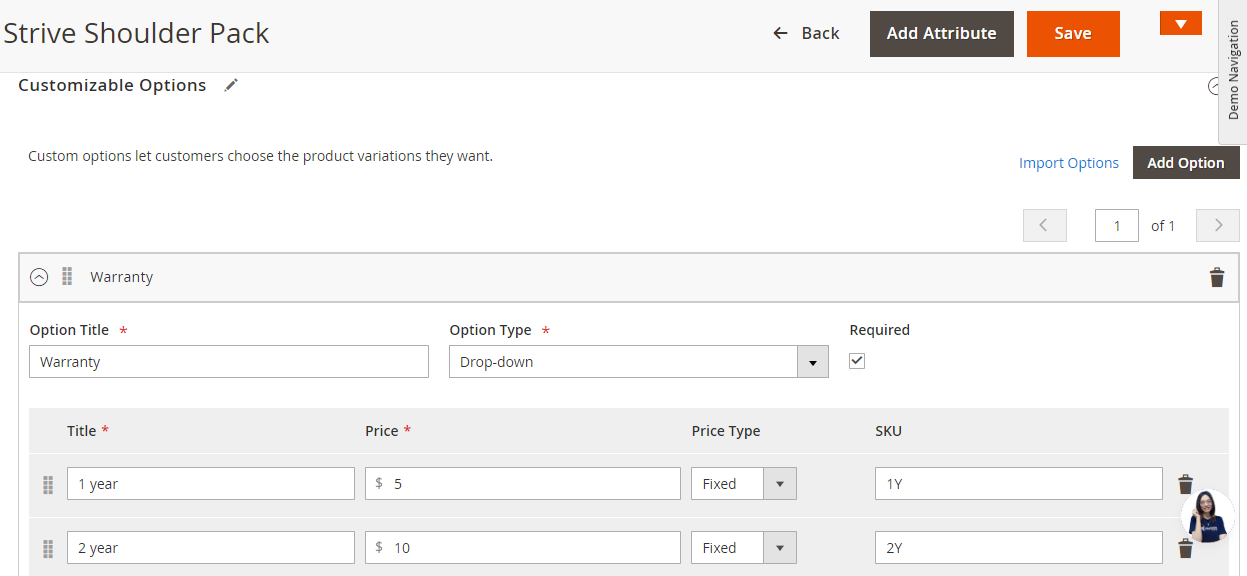
- Scroll down to locate the Customizable Options section and select "Add Option."
- Enter the title and type for the option.
- Determine if the option is mandatory by checking the "Required" checkbox.
- Click on "Add Value" and complete the following fields:
- Title
- Price
- Price Type
- SKU

- Once you've finished, save your settings.
- This is how it appears on the product page.

After configuring your custom options, make sure to save your changes to ensure everything is properly set up. This step is crucial for the options to be available to your customers.
Once saved, your custom options will be visible on the product page, allowing customers to select according to their preferences. This feature enhances the shopping experience by offering personalized choices.
By implementing custom options, you can better cater to your customers' needs and improve product visibility. This ultimately contributes to increased engagement and potential sales on your site.


Please complete your information below to login.