How to Configure Braintree Payment Method in Magento 2
Braintree is a full-stack payment platform which allows your customers to check out by accessing credit and debit cards, PayPal, Apple Pay, Android Pay, Venmo, Bitcoin, and more. With Braintree platform, you can easily accept payment from app or website.
However, Braintree Payment Method can only be used with your store only when Magento Secure Payment Bridge is enabled and configured correctly. What is more, though it is announced that Braintree can be used for all kinds of organization, there are still some types of business which are not supported and Braintree is only available for merchants from eight countries: United States, Canada, Australia, Europe, Singapore, Hong Kong, Malaysia, and New Zealand. Therefore, to set Braintree payment method in your Magento store, you may want to find more details about Braintree and their acceptable use policy at their site before starting the configuration.
In this post, we will guide you through 6 steps to configure the Braintree Payment Method in Magento 2.
6 Steps to Configure Braintree Payment Method in Magento 2
Step 1: Start the Braintree Payment Method Configuration
- On the Admin sidebar, choose Stores > Settings > Configuration.
- In the panel on the left, click Sales > Payment Methods.
- Click to expand the Braintree section then click on the Configure button to start the configuration.

Step 2: Set options for Basic Braintree Settings
- In the Basic Braintree Settings section, go to Braintree Payments to log in or sign up for a new account or click on Click here to login to your existing Braintree account Or click here to signup for a Braintree account and get your credentials.
- In the Title field, enter a new title or leave the default of “Credit Card (Braintree)”.
- In the Environment field, set “Sandbox” to configure in the test environment or set “Production” when you ready to go live.
- In the Payment Action field, select “Authorize Only” to approve the purchase, but put a hold on the funds to waiting for being captured by the merchant or “Authorize and Capture” to imply that the purchase is already authorized and can be withdrawn from the customer’s account at once.
- In the Merchant Account ID, Merchant ID, Public Key and Private Key fields, Enter the credentials from your Braintree account.
- Set Enable this Solution to “Yes” to activate Braintree payment method.
- Set Enable PayPal through Braintree to “Yes” to include PayPal as a payment option with Braintree.
Magento 2.0

Magento 2.1

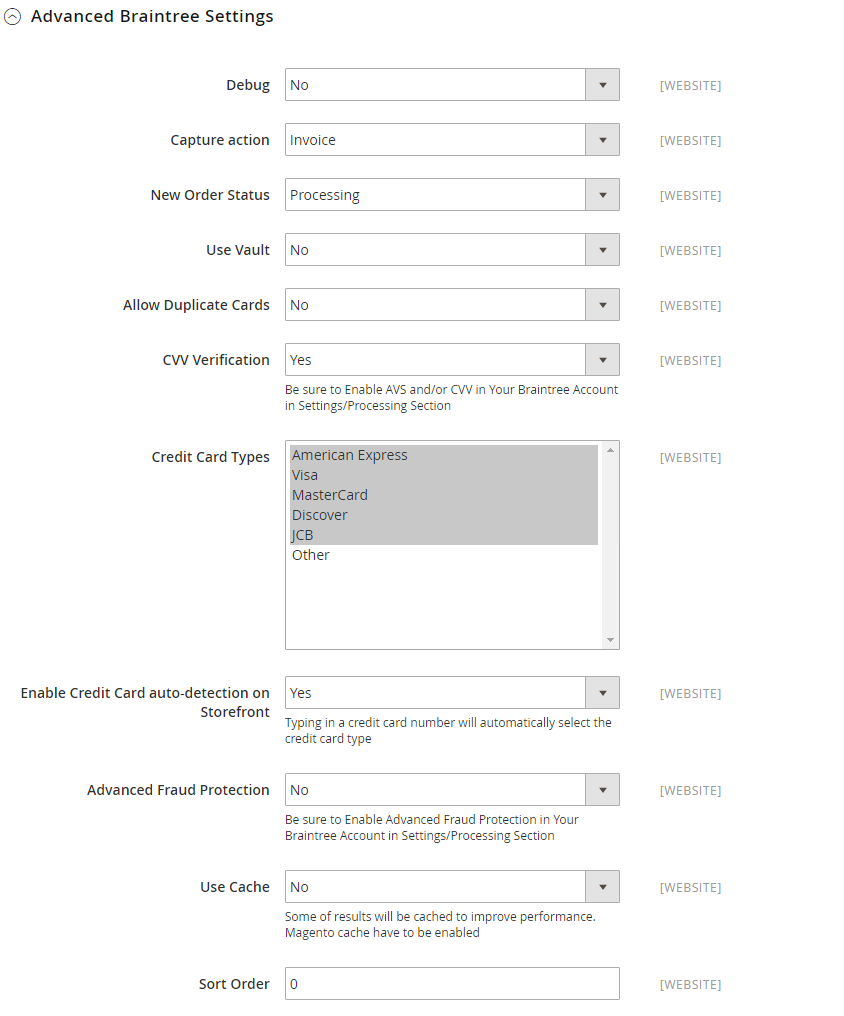
Step 3: Set options for Advanced Braintree Settings
- Set Debug to “Yes” to save a log file of interactions between your store and Braintree.
- In the Capture action field, choose “Invoice” to create an invoice when the payment is captured or “Shipment” to create invoice and shipment record when the payment is captured and change the status of the order to “Authorized”.
- In the New Order Status field, set “Processing” or “Suspected Fraud”.
- Set Use Vault to “Yes” to store customer credit card information in the Braintree vault.
- The Allow Duplicate Cards field is set to “No” by default. You can change this setting at your discretion.
- Set CVV Verification to “Yes” to require customers to provide the 3-digit security code> from the back of a credit card. If you want to use CVV verification, make sure to enable AVS and/or CVV in the Settings/Processing section of your Braintree account.
- In the Credit Card Types list, choose the types of the credit card which are accepted by your store as payment through Braintree.
- Set Enable Credit Card auto-detection on Storefront to “Yes” to detect the credit card type when the customer enters the number.
- Set Advanced Fraud Protection to “Yes” to apply Braintree fraud protection to transactions. Make sure that Advanced Fraud Protection is enabled in the Settings/Protection section of your account.
- Set Use Cache To “Yes” to improve performance by caching some results. Notice that the Magento cache must be is enabled to use the cache with Braintree.
- In the Sort Order field, enter a number to determine the position of Braintree Payment Method in the list of payment methods that is shown on the checkout page (start from 0).
Magento 2.0

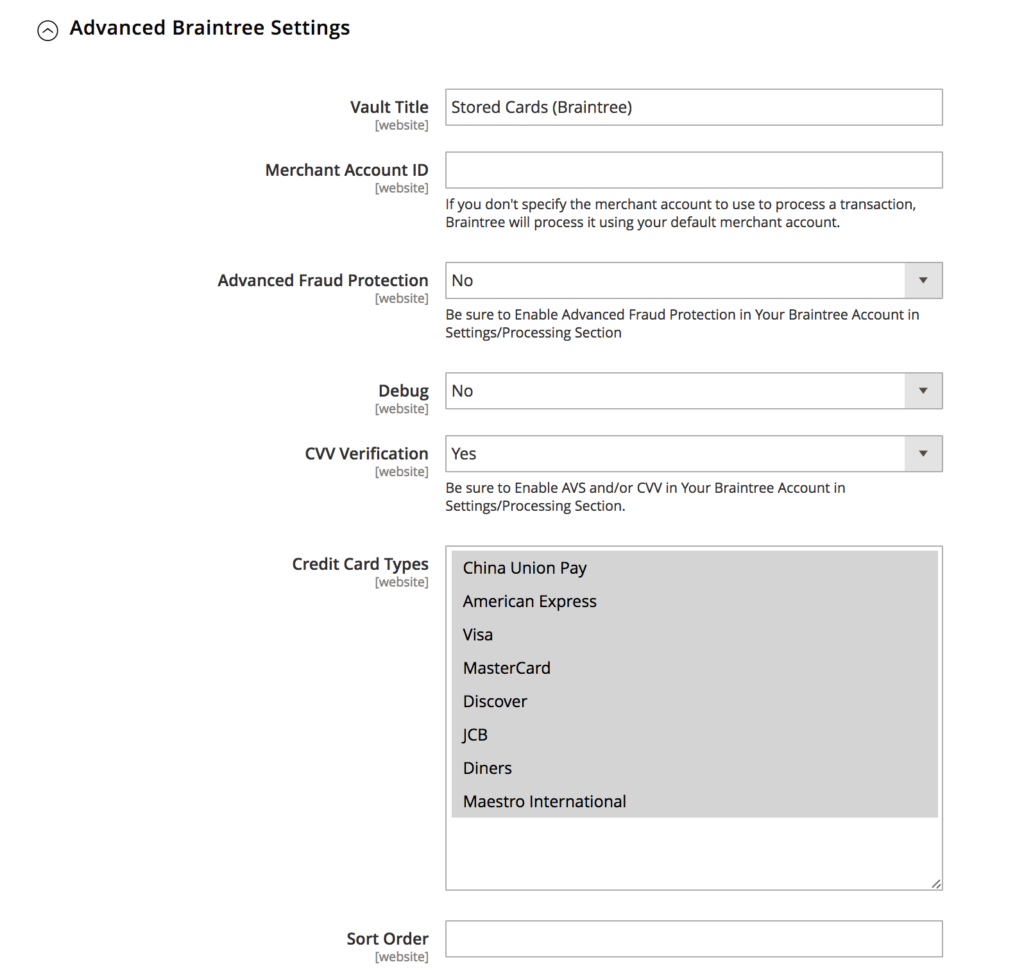
Magento 2.1
This Magento version updates 2 more configs.
- Fill in the Vault title.
- Enter the credentials from your Braintree account into the Merchant Account ID field.

Step 4: Set options for Country Specific Settings
- In the Payment from Applicable Countries field, choose “All Allowed Countries” to accept Braintree Payment Method for customers from all countries specified in your store configuration or “Specific Countries” to approve this payment method for some definite countries which you select from the Payment from Specific Countries list.
- In the Country Specific Credit Card Types section:
- Click on the Add button.
- Select the Country and choose the Allowed Credit Card Type from the list.
- Repeat to identify the credit cards that are accepted from each country.

Step 5: Set options for PayPal through Braintree Settings
- In the Title field, enter a new title or leave the default of “PayPal (Braintree)” to display Braintree’s payment by PayPal on the checkout page.
- In the Sort Order field, enter a number to determine the position of Braintree’s payment by PayPal in the list of payment methods that is shown during checkout (start from 0).
- In the Override Merchant Name field, enter the name as you want it to appear to display your merchant name differently than what is specified in your store configuration.
- In the Payment Action field, set “Authorize” to approve the purchase, but puts a hold on the funds to wait for being captured by the merchant or “Authorize and Capture” to imply that the purchase is already authorized and can be withdrawn from the customer’s account at once.
- In the New Order Status field, set “Processing” or “Suspected Fraud”.
- In the Payment from Applicable Countries field, choose “All Allowed Countries” to accept Braintree’s payment by PayPal for customers from all countries specified in your store configuration or “Specific Countries” to approve this payment method for some definite countries which you select from the Payment from Specific Countries list.
- Set Require Customer’s Billing Address to “Yes” to require that customers provide a billing address.
- Set Display on Shopping Cart to “Yes” to display the PayPal button in the mini shopping cart and on the shopping cart page.
- Set Allow to Edit Shipping Address Entered During Checkout on PayPal Side to “Yes” to enable customers to edit the shipping address while completing a PayPal transaction.
- Set Debug to “Yes” to save a log file of interactions between your store and PayPal through Braintree.
Magento 2.0

Magento 2.1

Step 6: Set options for 3D Verification Settings
- Set 3d Secure Verification to “Yes” to add a verification step for customers using credit cards that are enrolled in a verification program such as Verified by VISA.
- Click the Save Config button in the upper-right corner when you are done.
Magento 2.0

Magento 2.1
There are 3 more options:
- Set the Threshold amount.
- Choose to verify for Applizable Countries or for Specific Countries.

Step 7: Set options for Dynamic Descriptors
This section is ONLY available in Magento 2.1.
Basically, Dynamic Descriptors is the custom descriptor configured and passed with each transaction via the API. In this section, there are 3 options to fill the Name, Phone and URL of the description.

The bottom line
Payment method option is one of the reasons that strongly influences customers’ purchase decisions. Hence, a completed solution like Braintree could save you from a headache. The above 6 steps will help you configure the Braintree Payment Method for your online store instantly. If you still need help, contact us for more information. Don’t forget to check other payment method setup guidelines, and we will see you in the next posts!


Please complete your information below to login.