How to Change Store Email Addresses in Magento 2
Changing Store Email Addresses is one of the most important tasks when you start selling on Magento 2. You can have up to five different email addresses to represent distinct functions or departments for each store or view. In addition to the following predefined email identities, there are three custom identities that you can set up according to your needs.
- General Contact
- Sales Representative
- Customer Support
Each identity and its associated email address can be associated with specific automated email messages and appear as a sender of email messages that are sent from your store. The contact us form will be sent to a different email address. Thanks to this, you can reduce workload for admins and ensure faster replies by allocating issues to the suitable departments.
After changing Store Email Addresses we recommend you install SMTP module to test and make sure the address is correct. SMTP extension is available on store.
3 Steps to Change Store Email Addresses
Step 1: Set Up the Email Addresses for Your Domain
Before you can configure email addresses for the store, each must be set up as a valid email address for your domain. Follow the instructions from your server administrator or email hosting provider to create each email address that is needed.
Step 2: Configure the Email Addresses for Your Store
In this step, you can set up email addresses for General Contact, Sales Representative, and Customer Support.
- On the Admin sidebar, click on
Stores. Then underSettings, chooseConfiguration. - In the panel on the left under
General, chooseStore Email Addresses. - Expand the
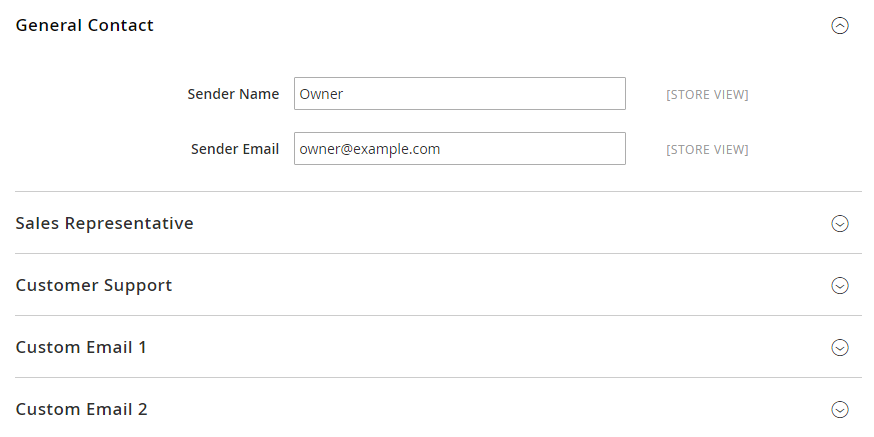
General Contactsection, and do the following:

- In the Sender Name field, type the name of the person to appear as the sender of any email messages that is associated with the General Contact identity.
- In the Sender Email field, type the associated email address.
- Repeat this process for each store email addresses that you plan to use.
- When complete, click
Save Config
Step 3: Update the Sales Email Configuration
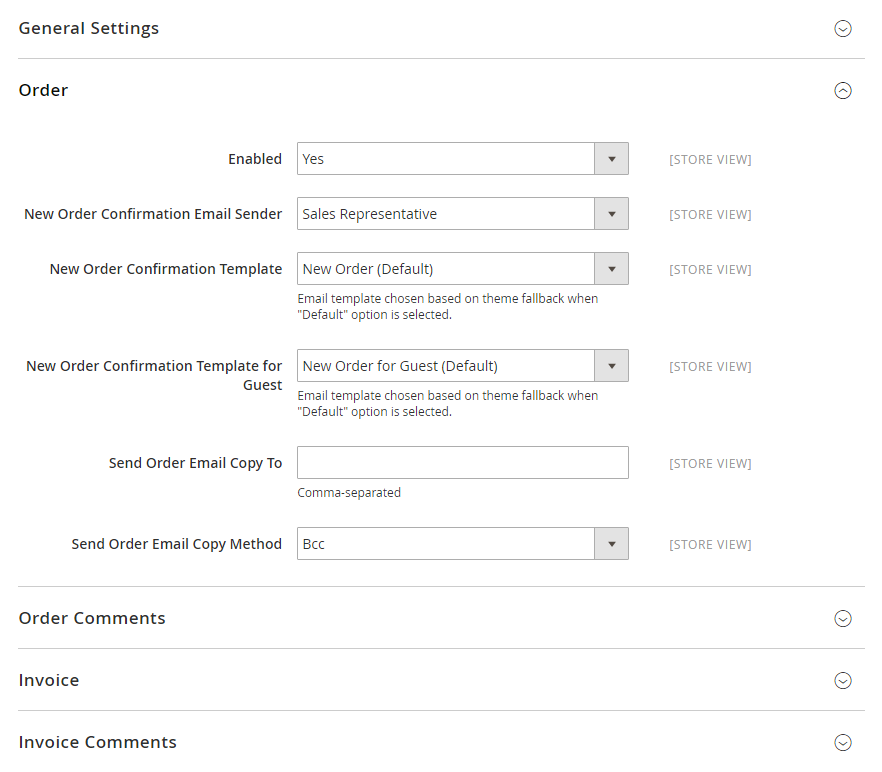
Now, you will change emails that will be used on sales documents such as orders, invoices, shipment, and credit memos. If you use custom email addresses, make sure that you update the configuration of any related email messages, so the correct identity appears as the sender.
- In the panel on the left, under
Sales, chooseSales Emails. The page has a separate section for each of the following- Order and Order Comments
- Invoice and Invoice Comments
- Shipment and Shipment Comments
- Credit Memo and Credit Memo Comments
- Starting with Order, expand the section for each message, and make sure that the correct sender is selected.

- When complete, click
Save Config.
Final words
Changing Store Email Addresses in Magento 2 is as easy as that. Follow step by step and you can create a better email management system, as well as enhance customers’ experience greatly. Check the below posts if you want to change other elements of your store details. And don’t forget to write comments so we know what your thoughts are on this!


Please complete your information below to login.