
End-to-end (E2E) testing is crucial for ensuring the overall functionality and reliability of Angular applications. It involves testing the complete workflow of an application, from user interactions to backend integration, to verify that all components work together seamlessly. By simulating real user scenarios, E2E testing helps identify potential issues that might not be evident through unit or integration tests, providing a more comprehensive assessment of the application's performance and usability.
To effectively master E2E testing in Angular applications, it's essential to leverage tools like Protractor or Cypress. These frameworks allow developers to write and execute test scripts that interact with the application as a user would, validating key functionalities such as form submissions, navigation, and data handling. Additionally, incorporating best practices such as maintaining clear and concise test cases, using test data effectively, and ensuring tests are reliable and repeatable can significantly enhance the quality and stability of your Angular applications.
Angular E2E testing focuses on evaluating the entire application as a unified system, covering multiple components, services, and interactions within the application. By conducting end-to-end tests, developers ensure that all parts of the application work harmoniously, verifying the complete flow from one end of the application to the other.
End-to-End (E2E) testing in Angular is designed to validate the full application workflow, ensuring that every element functions as intended from start to finish. Angular has historically provided strong tools for E2E testing, with Protractor being a widely-used option. However, with the deprecation of Protractor, Cypress has emerged as a preferred choice among developers for conducting E2E tests in Angular projects. This guide will walk you through the process of setting up and writing E2E tests in Angular using Cypress.
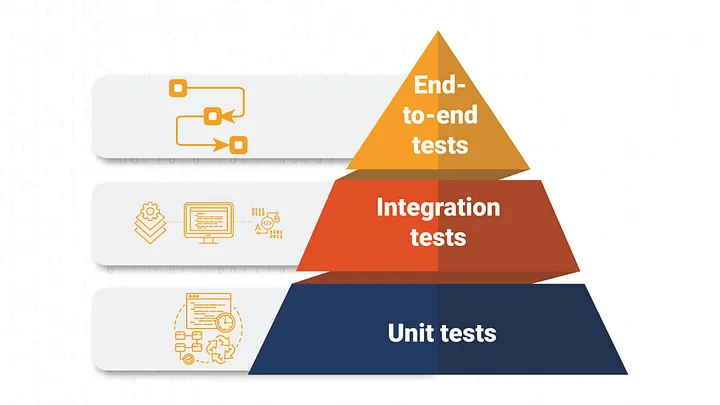
While testing may not be universally embraced by all programmers, it is undeniably a crucial practice. Test-Driven Development (TDD) and Behavior-Driven Development (BDD) are two prevalent methodologies, with BDD evolving from the principles of TDD. Unit testing is used to evaluate individual units of code, while E2E tests are employed to assess the system's overall functionality.
Creating E2E tests in Angular requires running tests that simulate the complete application flow, covering user interactions, navigation, and data validation. To effectively run E2E tests in Angular, it's essential to choose an appropriate testing framework, establish a reliable testing environment, and organize your tests methodically. Below is a step-by-step guide to help you through the process:
Choose a Testing Framework
Angular developers commonly utilize Protractor or Cypress for E2E testing. These testing frameworks are well-regarded for their extensive use and significance within the testing community. Each framework comes with its unique advantages and limitations:
Protractor
Protractor is the official E2E testing framework for Angular, built on WebDriverJS and designed to work seamlessly with Angular applications. Developed by the Angular team, Protractor offers stability and specific advantages for testing Angular apps. However, it is considered somewhat outdated compared to more modern tools like Cypress.
Cypress
Cypress is a modern, developer-friendly E2E testing framework recognized for its ease of use, fast test execution, and robust debugging capabilities. Cypress tests are highly valued for their simplicity and speed, making it a popular choice for Angular projects, suitable for both small and large applications. While Protractor is still used in Angular projects for creating and running test cases using configuration and spec files, Cypress is increasingly favored by developers due to its modern approach.
Comparing E2E Testing Frameworks: Protractor vs. Cypress
| Feature | Protractor | Cypress |
|---|---|---|
| Purpose | Designed specifically for Angular applications | General purpose E2E testing framework |
| Installation | More complex setup, requires Selenium and WebDriver | Simple installation with npm install cypress |
| Integration with Angular | Built for Angular, integrates seamlessly | Can be integrated with any front-end framework, including Angular |
| Speed | Slower due to WebDriver communication | Faster, runs directly in the browser |
| Debugging | More challenging, involves multiple processes | Excellent debugging tools with real-time reload |
| Community Support | Extensive, but declining due to deprecation | Growing rapidly with strong community support |
| Learning Curve | Steeper, requires understanding of Selenium WebDriver | Lower, easier for beginners to pick up |
| Test Writing Syntax | Uses Jasmine or Mocha for test writing | Uses Mocha and Chai for test writing |
| Real-time Reloading | No real-time reloading | Supports real-time reloading |
| Automatic Waiting | Requires manual handling of waits and timeouts | Automatic waiting for DOM elements to be available |
| Parallel Testing | Supported through Selenium Grid | Built-in parallelization support |
| Screenshots and Videos | Requires additional setup | Automatically captures screenshots and videos |
| Browser Support | Supports multiple browsers through WebDriver | Supports Chrome and Firefox, with limited support for others |
| CI Integration | Supported, but requires more configuration | Seamless CI integration with many providers |
| Custom Commands | Limited and complex to implement | Easy to create custom commands |
| API Testing | Not natively supported | Built-in support for API testing |
2. Set Up Your Testing Environment
First, make sure that Node.js and npm are installed on your system. If they are not, you will need to install them before proceeding with the setup.
Next, decide whether to create a new Angular project specifically for your E2E tests or integrate these tests into your existing Angular project. This will depend on the structure and needs of your project.
Finally, install your chosen testing framework, such as Protractor or Cypress, and any required dependencies. Afterward, configure your testing environment by writing a configuration file that includes details like the base URL of your Angular application and other necessary settings. Organize your test files properly, ensuring they follow the conventions of the framework you’re using.
3. Write E2E Tests:
Develop E2E tests that simulate various user scenarios and cover key functionalities of your application. These tests should mimic user interactions with your app.
Perform actions such as clicking buttons, filling in forms, and navigating through different pages, then verify that the application responds correctly by displaying the right data, showing error messages, and rendering UI elements as expected.
Structure your tests into organized suites and spec files to maintain clarity and manageability. The spec files will contain the actual test cases where the expected behaviors are asserted and validated.
4. Handle Authentication:
If your Angular application requires user authentication, ensure that your E2E tests can handle it. You may need to create test users or use tokens to authenticate in your tests.
5. Mock Backend Services:
To ensure consistent results and isolate your E2E tests from external dependencies, it's recommended to mock backend services during testing. This approach helps in creating a controlled environment for your tests.
Utilize tools such as ng-mocks, Angular’s HttpClientTestingModule, or custom interceptors to simulate API calls and handle responses without relying on actual backend services.
By stubbing API interactions, you can focus on testing the application’s behavior in a predictable and reliable manner, reducing the impact of external factors on your E2E tests.
6. Run Your Tests:
Run your E2E tests using the command-line tools provided by your testing framework, or integrate them into your CI/CD pipelines for automated testing. Execute tests both locally during development and within your CI/CD pipeline to identify issues early and prevent regressions.
E2E tests play a critical role in maintaining the quality and reliability of your Angular application. It's important to regularly review and update your testing strategy to reflect changes in your application’s architecture and evolving requirements.
In end-to-end testing, you replicate the actions and experiences of a real user interacting with your application. Organize your tests into suites to group related tests, making them easier to manage and maintain. Following best practices is key to maximizing the effectiveness of your E2E testing efforts.
Test Repeated User scenarios
End-to-end testing can be complex and time-consuming, as it involves testing all potential edge cases to ensure complete coverage. However, it's not always feasible to test every single scenario. Instead, prioritize focusing on the most common and critical use cases to ensure your application performs reliably in key situations.
Prioritize the Right Aspects
Prioritizing what to test is crucial because end-to-end testing can become overwhelming and complex. Focus on testing features that have the most significant impact on your business first. Once the critical functionalities are well-tested, you can address less critical edge cases to ensure comprehensive coverage.
Make Testing Realistic
End-to-end testing should replicate real user interactions as closely as possible. Users often engage with elements like images or videos before taking further actions. Ensure your tests simulate these real-life behaviors to better reflect user experiences.
Error Monitoring
Since end-to-end testing involves comprehensive testing of the entire application or new features, it’s essential to address and resolve errors during coding phases. This approach helps minimize complexity and ensures smoother testing phases.
Optimize Testing Environment
Creating an optimal testing environment streamlines the testing process. Aim to minimize setup time and efficiently manage data cleanup between tests, which can greatly facilitate the testing workflow.
How to Set up Cypress
1. Setting Up Cypress in Angular
First, you need to install Cypress in your Angular project.
Install Cypress:
bash
npm install cypress --save-dev
Add Cypress to scripts in package.json:
json
"scripts": { "cypress:open": "cypress open", "cypress:run": "cypress run" }
Initialize Cypress Configuration
To set up Cypress for the first time, open the Cypress application to automatically generate the required configuration files. This step is crucial for configuring your test environment and setting up the basic structure needed for writing and running tests.
bash
npm run cypress:open
This will create a cypress folder with the following structure:
cypress ├── fixtures ├── integration ├── plugins └── support cypress.json
2. Configuring Cypress
Modify cypress.json to set up your base URL and other configurations:
json
{ "baseUrl": "http://localhost:4200", "integrationFolder": "cypress/integration", "fixturesFolder": "cypress/fixtures", "pluginsFile": "cypress/plugins/index.js", "supportFile": "cypress/support/index.js" }
3. Writing Your First E2E Test
Create a test file in the cypress/integration folder, e.g., home.spec.js:
/* javascript */
describe('Home Page', () => {
  it('should display the welcome message', () => {
    cy.visit('/');
    cy.contains('Welcome to Your Angular App').should('be.visible');
  });
});
4. Running E2E Tests
Run tests in the Cypress Test Runner:
bash
npm run cypress:open
This opens the Cypress Test Runner where you can interactively run and debug your tests.
Run tests in headless mode:
bash
npm run cypress:run
5. Writing More Complex Tests
Example: Testing a Form Submission
Create a form component in Angular:
Create a test file for the form:
/* javascript */
describe('Form Page', () => {
  beforeEach(() => {
    cy.visit('/form');
  });
  it('should submit the form successfully', () => {
    cy.get('input[name="username"]').type('testuser');
    cy.get('button[type="submit"]').click();
    cy.contains('Form submitted successfully!').should('be.visible');
  });
  it('should show validation error if username is empty', () => {
    cy.get('button[type="submit"]').click();
    cy.contains('Username is required').should('be.visible');
  });
});
6. Integrating with Continuous Integration (CI)
To integrate Cypress tests with your Continuous Integration (CI) pipeline, add the necessary Cypress commands to your CI configuration file. This might include files such as GitHub Actions, GitLab CI, or Travis CI. Configuring these commands ensures that your Cypress tests are automatically run during your CI processes, helping to catch issues early and maintain the quality of your application.
Example: GitHub Actions Workflow
# yaml
name: CI
on: [push, pull_request]
jobs:
  e2e-tests:
    runs-on: ubuntu-latest
    steps:
      - uses: actions/checkout@v2
      - name: Set up Node.js
        uses: actions/setup-node@v2
        with:
          node-version: '14'
      - run: npm install
      - run: npm run start &
        continue-on-error: true
      - run: npx wait-on http://localhost:4200
      - run: npm run cypress:run
Benefits of End to End Testing
Reduced Risks
With a well-established deployment workflow, every stage of the application's release will undergo testing. This proactive approach helps identify issues with specific functionalities early in the process, minimizing the risk of problems appearing later.
Increased Confidence
By incorporating real user interactions and behaviors into your tests, you can ensure that your application functions as expected in practical scenarios. This thorough testing boosts confidence in the stability and reliability of your release, making it easier to trust the final product before going public.
Reduced Cost and Time
Deploying a buggy application can lead to negative user experiences and costly bug fixes. By implementing end-to-end testing, you catch issues earlier and reduce the need for extensive debugging and fixes post-release, ultimately saving both time and money.
Future Trends in E2E Testing for Angular Applications
As web development evolves, so do the trends in end-to-end (E2E) testing for Angular applications. A notable trend is the shift towards developer-friendly frameworks like Cypress, which offer enhanced speed, ease of use, and advanced debugging features. This trend reflects the need for quicker development cycles and more efficient testing workflows.
There is also a growing focus on integrating E2E testing into Continuous Integration/Continuous Deployment (CI/CD) pipelines. This integration ensures that tests are automatically executed with each code update, boosting the reliability and stability of Angular applications.
Additionally, the use of artificial intelligence (AI) and machine learning to predict and identify potential issues before they arise is becoming more common. This proactive approach to testing helps in anticipating problems and addressing them early. Moreover, the rise of Progressive Web Apps (PWAs) with their specific testing needs is leading to the development of more specialized E2E testing tools and methodologies.
Finally, there is an increasing trend towards adopting comprehensive testing strategies that combine E2E testing with other forms of testing, such as unit and integration testing. This holistic approach provides a thorough validation of application functionality and performance, aligning with the demands of modern web development.
Conclusion
End-to-end (E2E) testing focuses on evaluating the overall functional flow of an application. It is instrumental in identifying issues before the public release, ensuring that all components work together as intended.
Various tools, such as Protractor, Cypress, and Playwright, are available for performing E2E testing. These tools help automate the testing process and provide valuable insights into application performance and reliability.
Utilizing E2E testing is essential for verifying the robustness and functionality of your Angular application. With Cypress, you can create detailed tests that mimic real user interactions, offering assurance that your application operates correctly. Setting up Cypress is simple, and its advanced capabilities make it a top choice for contemporary E2E testing.